Monday, September 2, 2013

WOW! 59 POSTS...59 MEMBERS!

I want to thank everyone for following my blog and lending your support.  
I just noticed that I have 59 posts and 59 wonderful followers!!!  
I just love it when things of coincidence happen...like matching numbers.
I feel like the whole universe is going to open up and shower me with riches.  
The bells go off and the confetti falls...like I won the lottery or something...lol!  
Anyway, in honor of this serendipitous moment, I think that I will switch it 
up a bit and give you a peek at what I have been working on lately.  
TIN JEWELRY!


These are earrings made from a recycled tin box.  The kind that cookies come in at Christmas time.  Would you like to know how it was done?  Well...I completely cut the tin box apart using a metal shears that I purchased from the jewelry supply store, drew the shape with a Sharpie pen (on the back) and then cut it out with the metal shears.  To finish the edge of the earrings (the tin is sharp), I filed the rough edges with a metal file and then went over the entire edge with a fine grit metal sandpaper.  I also used a dap mold and dap tool to hammer a curved shape....although, this is not necessary.  Lastly, I used acrylic paint pens or enamel nail polish to paint the design, punched a hole in the top with a metal punch or drill and then added the earring wires.

Clockwise: Hammer, metal punch, metal shears, file, cut tin, dap tool and wooden dap block
Hope that you enjoyed this tutorial and that I have inspired you to try your hand at some simple metal forging.  It's challenging but FUN!

Until next time!
Hugs,
Ginny

Saturday, August 24, 2013

DYED PAPER


A friend of mine and I have been experimenting with dying our own paper using different plants, fruits and vegetables.  We were inspired by Laura Ryan's article "Boiled Books" in the Summer 2013 edition of Pages by Cloth Paper Scissors.  In the article Laura explains how she uses different plant materials, sandwiched between sheets of watercolor paper and boiled in a bath of water and vinegar to release the magnificent colors and patterns of the organic material.  

So...with my scouts looking out for different flowers that were thought to release eye catching colors, I started collecting and preserving flowers in my refrigerator until I had enough variation to start the process.  You can freeze the plants too.

Listed below are the plant materials that I used to make the papers pictured but you are not limited to those....there is a whole world of possibilities out there. Experiment!

Ferns - mostly provide pattern
Bushes with leaves - mostly provide pattern
Yellow onion skin - provides mustard and brown colors
Purple onion skin  - provides grey and purple color.
Sliced  red beets -  provides beet red color
marigold flowers - provides orange, mustard and rust colors
Whole blueberries - provides deep blue color
Purple queen plant _ provides delicate purple color and great pattern
Dried crasins - provided only pattern...interesting
Dried Cinnamon - provided a deep rust color
Dried mustard - provided a yellow orange color
Tea and coffee grounds - provided a tea stain look... some speckles.
Sliced strawberries - provided light pink color but the seeds made a great pattern.
(Note: My friend used dried eucalyptus and the dye from the plant added a beautiful turquoise color.  Consider dried flowers that you might already have as they can often give off rich colors.)


This is the process:

You will need the following material in addition to the plant materials:

  • Sheets of 140 lb watercolor paper  (I used Strathmore 300 but my friend used Printmaking paper and the more expensive Arches paper and the colors were much more vivid and the patterns more distinct. The author recommended 100% cotton rag.  I discovered that the paper does make a difference.  Next time I will use Canson 100 which is 100% cotton.)
  • A large stew pot. 
  • Heavy cardboard, matte board, or plywood cut to the size of your paper but not so large where it will not lay flat in the stew pot.  (I used two hot pads that were metal on one side and paper on the other.  I found them at a discount store for $1.00 each.)
  • Rubber bands, string or clamps to hold the cover tightly to the papers.
  • 1 cup white vinegar. 
  • Tongs, cookie sheet and newspaper.
  • Something to weight the paper stack in the water (a brick or heavy object).  It needs to be completely submerged.

1. Cut or tear (gives a nice deckled edge) the watercolor paper to size.  I made several paper sheets and folded them in half.  Position the vegetation between the fold.  Both sides between the fold will be dyed but the back side will not.  (If you wish, you could fold the paper into an accordion and place the vegetation between all folds, front and back, so it will dye both sides of the paper. Don't forget the top and bottom of the stack.)

2. Place the flowers, branches, fruits and vegetables on one side of the paper.  Fold over to enclose the vegetation inside the fold.

3. Stack the papers with the vegetation between the folds and place the cardboard or cover material on the top and bottom of the stack.  (Squish it down.) Secure with clamps, rubber bands or string.

4. Fill a stew pot with water and 1 cup of white vinegar. Completely submerge the stacked paper in the water and use a brick or heavy object to weight it. Bring the water to a full boil and then reduce to simmer and cook for 1 1/2 hours.

Note:  If you want a darker result, you can add coffee, tea, or additional plants to the water.

5. When finished cooking, use tongs to carefully remove the paper from the water and set it on a cookie sheet lined with newspaper.  Careful....don't burn yourself or get any of the juice on a light colored formica counter top...it could stain.

6.  Allow it to drain overnight.

7.  Very carefully, unwrap the papers and remove the large pieces of vegetation. The paper is very fragile when wet and you may need to allow the paper to dry completely.  Once dry, use a soft brush to remove the remainder of the vegetation and if necessary, the pages can be ironed to flatten.


Don't forget scraps to make mini books.
Well...that's it for now.  Let me know if you try this process and your results.  I would love to know what you use for certain colors and how you use the dyed paper.

Hugs,
Ginny

Monday, August 5, 2013

MORE ATC's (From magazine ads)

These were really fun to make!  I was looking through the Sunday paper when I came across a J.C. Penney's ad and something about the model's pose and facial expression struck me as unusual and perfect for using in my ATC's.  I don't know why I liked these better than the ones in fashion magazines... something about them!!!  Maybe an attitude???? 

The very first one that I made, the boy with the green tie, I hated and almost tore it to shreds but from past experience I learned that everything can be fixed with a little gesso and new paint.  At first the background was too dark so the gesso helped to lighten it up quite a bit...it was a plus that some of the underlying color bled through the gesso and tinted it so that I didn't need to recolor the background...I just doodled over the top with Gelly Roll pens.  I also didn't particularly like the painted tie but now I think that the tie is what really makes it interesting.

The backgrounds were left-overs from making stenciled inky journals or from failed art work and the doodles were made using Gelly Roll pens and my fave, a white Signo Unaball pen.


Until next time!
Hugs!!!
Ginny

ZETTI STYLE ATC's

I think that these are my favorite of all the ATC's that I have made recently.  I love how the  clip art images go with the stenciled inky paper and their over all quirkiness.  I know that human heads on animal bodies or vice versa is nothing new but the process for ME was really gratifying.  I NEED to vary from the norm..."step outside the box" every now and then.  I am a conservative type of gal and need to try something different.  You know what I mean???

Anyway, I hope that you like them. 


Until next time,
Hugs!
Ginny

MORE ATC's - LET'S HEAR IT FOR THE GUYS

I found these handsome fellows in my clip art collection and thought that they would be fun to use with my ATC's.  I especially love dressing them in PINK!  lol! Makes it more interesting...don't you think?

The backgrounds for these were made from left-over stenciled inky paper from journal making, failed art work and free papers from Summerset Studio Magazine.  The paper from Summerset Studio was a little thin for my liking so I backed them with heavy card-stock and then stitched by machine around the edge.  All the doodles were made using Gelly Roll pens, a black Pitt pen and a white Signo Uniball pen.


Until next time!
Hugs!!!
Ginny

MORE ATC'S

Do you have art supplies that you rarely use because you tried them and didn't like the result?  Maybe you need to give them another try.  That's what I did with my Gelly Roll pens and now I love them!!!   I bought mine ages ago and never used them until now because...well, I just didn't know what to use them for.  The size of the pen width is just perfect for a smaller projects like ATC's!

My favorite sets of Gelly Rolls are the Moonlight, Soufflés, and Metallics.  The Metallics are just that...beautiful metallic colors, the Souffles are beautiful light to medium matte colors and the Moonlight are bright, almost neon colors...all three sets write over black.  Yummy colors!!!!

I am finding that all the various kinds of pens: alcohol markers, watercolor Tombows, Gelly Rolls etc. all have a purpose...it's just a matter of determining which inks work with which surfaces.  Which pens work on the slick surface of acrylic paint or on water reactive paints and pencils, which write on light or dark colors, slick or textured surfaces.  It's a lot to think about but something that is worth knowing.

For the following ATC cards, I used mostly the Moonlight Gelly Roll pens and a few Gelly Roll Souffles.  The White and black ink lines were made using a white Signo Uniball and black Copic multi-liner pen.  These pens are wonderful when writing over watercolored backgrounds and dark colors but don't get them wet or use a water based varnish...the ink will smear!!!  (The Copic multi-liner is permanent and will not smear when used with water reactive paint or ink.)


This is how I made the ACT's:


Find a patterned paper to use for the background and cut it to size: 2.5" X 3.5."  I used an inky scrap of watercolor paper left over from a journal that I made.

Find a picture for the focal piece from the internet or clip art book.

Cut out the image and glue it to the card.

Determine where to frame the image with the outline detail.  Mark first with a white line and then very carefully mark with a parallel black line.

Now, doodle using Gelly Roll pens...draw spirals, dots, outlines, flowers, etc.

Use your imagination to make an ordinary image "over the top."

Tip:  If the paper that you used for the background is too thin, consider backing it with a piece of cardstock or thicker paper and machine stitching around the edge.

That's the gist of it!  Easy Peasy!!!!


Hope you enjoyed my ATC's and tutorial!

Until next time,
Hugs,
Ginny
Thursday, July 25, 2013

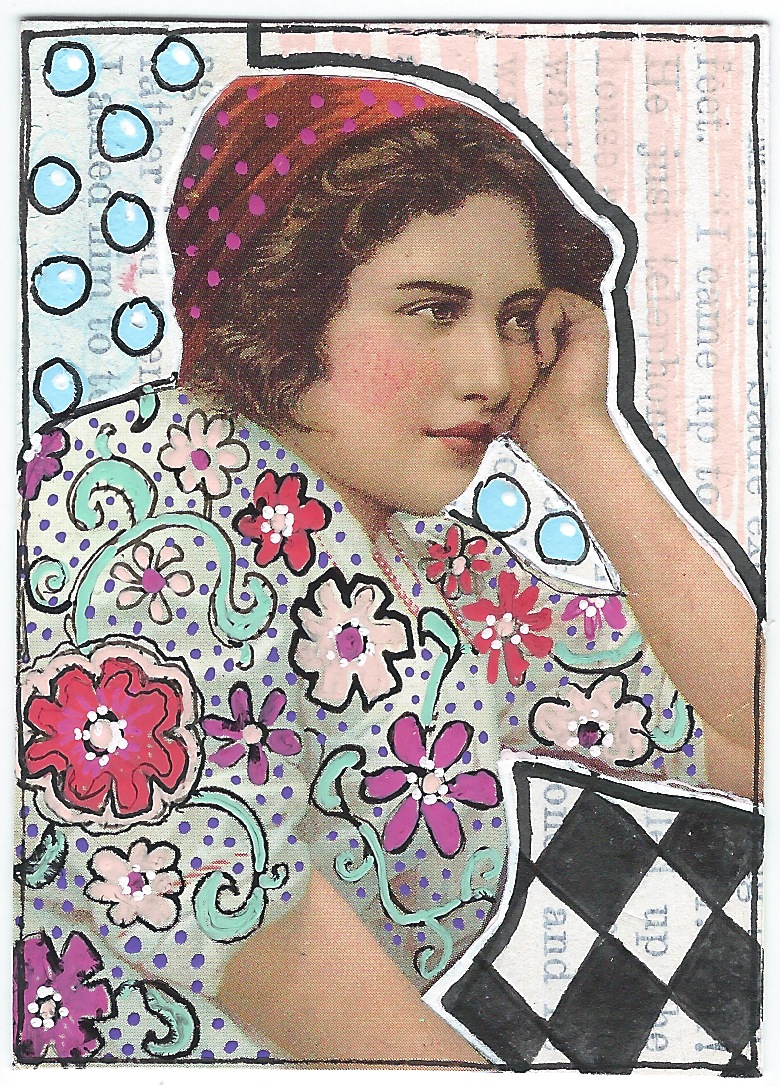
FLOWER GIRL ATC


Something a little different...I decided to use collage on an ATC (Artist Trading Card) instead of painting girl faces using Prismacolor pencils or Tombow markers.  I really like the way that it turned out...although, the slick paper from my clip art book didn't take the black pen very well and could be a little neater. Oops, is that my perfectionist self coming out again?  I must stop doing that!!!!

I used Gelly Roll pens for coloring the doodles and once I find a pen that won't skip on a slick surface, I plan to make more.  Maybe even make a larger canvas or two to hang in my studio.  I need to fill those walls!!!

Until next time,
Hugs!
Ginny