Thursday, July 25, 2013

FLOWER GIRL ATC


Something a little different...I decided to use collage on an ATC (Artist Trading Card) instead of painting girl faces using Prismacolor pencils or Tombow markers.  I really like the way that it turned out...although, the slick paper from my clip art book didn't take the black pen very well and could be a little neater. Oops, is that my perfectionist self coming out again?  I must stop doing that!!!!

I used Gelly Roll pens for coloring the doodles and once I find a pen that won't skip on a slick surface, I plan to make more.  Maybe even make a larger canvas or two to hang in my studio.  I need to fill those walls!!!

Until next time,
Hugs!
Ginny

Thursday, July 18, 2013

DOODLE ART AND LETTERING CLASS

I think that I mentioned before that I am taking yet another class 
given by Joanne Sharpe called "Doodle Art and Lettering."  
This makes nine classes that I have taken from Joanne
 and... I have to say that I am finally beginning to accomplish 
what I set out to do...to loosen up!

Being a former graphic artist, I have a tendency to draw what I 
would term...straight and neat.  Even when I draw without instruments, 
the lines are straight and neat!!!  I have been trying for the past 
year and a half to abandon this trait and can gladly say that with 
much practice, I am finally loosening up!!!  
I still have a ways to go before I am comfortable with the process 
and...at times my perfectionist self will sneak back in 
but for the most part...I am satisfied with my progress.  
Practice!  Practice!  Practice! 

This is my interpretation of an assignment from the "Doodle Art and 
Lettering" class.  The assignment was to draw a tree in the shape of an "X" 
and use doodle patterns that we either created or collected.  


Have you counted the number of critters in the picture?

Thanks for stopping by and until next time,

Hugs!!!
Ginny

Saturday, June 29, 2013

STAMPFEST ORLANDO!

I got up early today and went to Stampfest Orlando a rubber 
stamp/scrapbook/paper arts show that visits the Orlando area annually.  
This is one show that I usually don't miss...I love to see 
the hottest new products and check out the new techniques 
even though I am no longer into making cards with rubber stamps.   
I do, however, use a lot of the same supplies in my mixed media art 
and you never know what you might find that would prove to be useful.

This year there were 26 vendors and a guest visit from Tim Holtz.
Tim demonstrated many of the same techniques that he shows 
on the Ranger web site so nothing new there.  
The only new products that I noticed this year were the Wink of Stella Brushes 
and a lot of different variations of Liquid pearl type products.  
I came home with three new Tombow markers, 
three stamps for the back of the ATC's that I will be making and 
two Signo Uniball pens, one gold and one silver. 
Now I am ready for a cup of coffee and a nap!  I'm pooped!!!

Before I sign off...I drew a sunflower and painted it with TombowMarkers 
for a friend that is going through some difficult times.  
I hope that it cheers her up.  Five of the ladies in my Art Group are
doing the same so I hope that this will perform it's magic!!!


Until next time!

Hugs,
Ginny

Wednesday, June 26, 2013

PAINTED ARTIST TRADING CARDS

I have never made an ATC!!!  No never!!!!  I really don't know why...maybe because I see the small size as limiting or the thought of trading art work with other artists never occurred to me...or whatever was stopping me before...it is not stopping me now.

If you have been following my blog for very long you probably know that I have taken every single one of Joanne Sharpe's on-line classes.  Yes, all of them and I am not alone...so have many others.  And...after a while, you become pretty good friends with the other artists and become inspired and even influenced by them. That's how I became involved in ATC's.  One of the artists in Joanne's class started a closed FaceBook group to trade ATC's.  So....I thought that I would give it a try! "Nothing ventured, nothing gained."

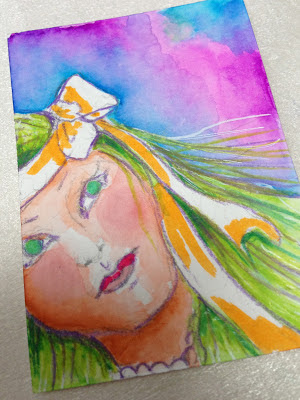
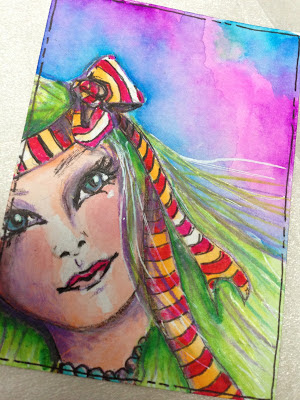
To get started I cut up scraps of watercolor paper to size, grabbed my Tombow markers and various other pens and pencils and got to work making ATC's. Whenever I get stumped for ideas of what to draw, I always turn to faces.  Faces are the most comforting to me, especially when you are not trying to draw anyone in particular.  And...because of the small size of the ATC's, I thought that I would draw just part of the face and feature the hair by painting it bright colors like blue, green or pink.  Here is the first of six that I made.


And this is how I made them.

I used:

Strathmore 300 Watercolor paper
Tombow watercolor markers
Prismacolor pencils
black Pitt pen, fine
Acrylic Paint marker, Painter's
Signo Uniball white pen
Koi waterbrush
White charcoal pencil


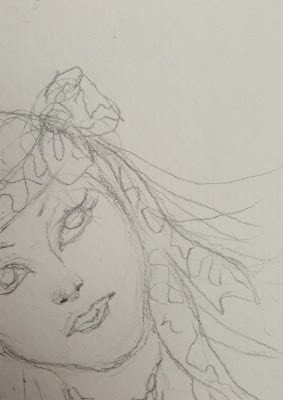
Lightly draw the girl in pencil.

Note:  Use a good quality watercolor paper because the Tombow markers will not blend on an inferior paper.

Using the Tombow markers, color areas of the paper.

Do not color the area solid as we are going to move the color around with water from a water brush or paintbrush. This will give it a nice watercolor look.

Be careful not to let the areas touch while wet unless you purposefully want the colors to blend.

I wanted the purple and turquoise to blend for the background but I did not want them to mix with the green hair. One way to avoid one color from bleeding into the adjacent color is  to let each section dry before you paint.

Blending the colors with a wet paintbrush or waterbrush.

Wet the areas of the Tombow paint until it starts to flow and then push it around to cover the desired area to be painted.  If you have to scrub with the paintbrush, you may not be using enough water. At the same time, be sure to get rid of the hard edges.

This may look a little watermarked or splotchy.  If you don't like the way it looks, re-wet the area and push the color some more.  This takes a little practice but also keep in mind that watercolor is supposed to be watermarked. Also, don't worry too much about a smooth background because it will be covered by the lettering.

See how the purple and turquoise is not completely mixed together?  I was striving to blend the hard lines but still allowing both the purple and turquiose to maintain their true color.  I was not trying to obtain a new color by mixing the two.

Leave some white paper showing in the area of her nose and chin...areas that you wish to come forward.  The areas to recede are darker in color.  This gives the face its rounded shape.


Now to add detail.

I used a medium purple Prismacolor pencil, Violet 1008, to start outlining the features of the face and to streak the hair.

I used a deeper green prismacolor pencil and a white Signo pen to add additional streaks to the hair.  I also added shading to areas of the hair that would appear under her face or scarf.

I added color to the eyes, lips and scarf with Tombow markers.  


In this step, I have deepened the shadows with prismacolor pencils and used a black Pitt pen for detail.

I used the Pitt pen to draw the stripes in the scarf,  accentuate the facial features and necklace, and draw a border around the edge of the card..

I added a dot of white highlight to the eyes and bottom lower lip and added more hair streaks with the Signo pen.

The red stripe on the scarf is Tombow marker.


The final step is to add the lettering.

I used a white charcoal pencil to draw the placement of the letters.  This later erases beautifully using a kneaded eraser.

Next, using a fine tip paint pen, draw the letters.

Once the paint is dry, outline the letters with a Signo pen.

Once all pen work is dry, erase any visible charcoal lines.


I hope that you enjoyed this tutorial and give it a try!!!  I welcome questions!


Hugs,
Ginny


Here are a few more ATC's using this technique.


Tuesday, June 18, 2013

PAPER LUNCH BAG JOURNAL


I thought that I would share how to make lunch bag journals.  
They are so simple to make!!!  
They make wonderful gifts and use materials that you probably 
already have around your house...that is 
if you pack lunches using paper lunch bags.

Materials used:
1 paper lunch bag.   5 1/8" X 10 5/8"
Art work 4 1/4" X 4 1/4"
Piece of fabric 5 1/4" X 5 1/4"
Washi tape, duct tape or any other decorative tape 11"
1 piece cardstock to insert in bag 5" X 10"
Cardstock, bristol, watercolor paper or graph paper (for pages) 5" X 10"
Waxed thread or dental floss (unflavored)  2 ft.
beads and buttons (2) for decoration

Tools used:
Awl or strong needle for punching holes
Heavy duty needle for stitching pages to cover
Sewing machine
paper cutter
Bone folder
Scissors
metal straight edge
x-acto knife


To stiffen the bag (mine was thin) cut a piece of card stock 5 " X 10" and insert it into the bag.  Next, fold over the open end of the bag toward the side with the bag bottom and tape closed.  For decoration, I also added a piece of tape to the bag bottom.

Inside cover


Leave the right edge of the bag bottom open as it later forms a pocket for inserting things like your business card, bookmark, etc.


pocket on iside cover

Making the journal cover:  Fold the bag in half with the tape to the inside.  On the cover (back side of the bag bottom), place a piece of fabric, center the art work on the fabric and stitch by machine.  If you don't have a sewing machine, you could use glue or hand stitch.  Also stitch around the edge of the back cover.

Making the inside pages:  Cut the inside pages to size, 5" X 10", fold in half, burnish the fold with a bone folder and stack....one inside the other.  Once the pages are stacked, trim the right side of the stacked pages using a ruler and x-acto knife so that  they will be neat and even and not stick out from the cover.  The more pages that you have, the more necessary it is to trim the edge.  Depending on the weight of the paper you are using and the number of pages, it may not be necessary to trim.  You be the judge!

Stitching the journal pages to the cover:  Now you are ready to stitch the pages to the cover and add the beads and button to the thread tail.  I used a bookbinder awl to punch three holes through all the pages and cover at the spine (Fold).  I made one hole in the middle and a hole about 1/2" from each end.

Thread a large heavy duty needle with the waxed thread and starting at the outside top hole of the cover push the threaded needle to the inside and through all the pages.  Make sure that you leave a 4" min. tail of thread on the outside of the cover.  Next, go from the middle inside hole to the outside. Then to the outside bottom hole to the inside and then back to the inside middle hole to the outside. You should now have two threads on the outside of the journal cover.  Bring the thread at the middle hole to the top of the journal and tie it off with the thread from the first hole.  Add beads and button to the tail, knot off and whal--la!!!  You are finished!!


Do you like the little party dresses?  I learned how to make them in Joanne Sharpe's class "Doodle Art and Letters."  I think that this class is going to be one of my most favorite Joanne Sharpe classes.  I love to doodle but I never considered myself very good at it.  My doodling used to consist of drawing spirals and circles....over and over again!!!  Boring!!!

Anyway, if you are like me and want to expand you doodling horizons...you should consider this class.  Joanne has a way of teaching doodling that makes it where anyone can do it....and believe me, I struggled with doodling for a long time.  I struggled with being loose!!!  In this class, Joanne teaches you to make reference cards with doodles such as hearts, stars, lines, flowers, etc. and then shows you how to combine them to make these wonderful whimsical drawings.  Just like the little dresses!!!!

Come join the fun!!!

Until next time!
Hugs!
Ginny

Saturday, June 8, 2013

THINGS ARE NOT ALWAYS AS THEY SEEM

It rained all day today so I spent most of the WHOLE day working in one of my journals.  I should be working instead on the lessons for the on-line classes that I am taking: 21 Secrets, Mermaid Circus and Letter Love 201.  If I don't, they will expire (except for Letter Love which is open forever) before I get to complete them but you know how it is when you have an idea for a journal page in your head and you just have to get it down on paper....well here is the result of my play day!

A collage embellished using acrylic paints and paint pens.
Thanks for stopping by!
Hugs!
Ginny


Friday, June 7, 2013

WHAT LURKS BENEATH THE BIG BLUE SEA?

Why do I always forget to take pictures of the process?  Anyway, here are several collages that I made using techniques that I learned from Teesha Moore in the on-line class, Mermaid Circus.


Until next time,
Hugs,
Ginny