I recently joined a challenge suggested by one of my on-line classmates, Ann Kristen Krier, to pick one word to summarize my intentions for the year. This word would be used to remind me of things that I need to resolve or work on in my life. It is like making a News Years Resolution but only expressing it in one little word. We were to paint our word using the techniques that we learned in Joanne Sharpe's "Letter Love 101" class.
My one little word to focus on for the year 2013 is "BE." I can't take complete credit for this as I originally had another word picked but when Joanne Sharpe posted her word for the challenge, "BE"....it hit me right between the EYES!!! This word says everything that I wanted to say...Be tolerant, Be generous, Be grateful, Be happy, Be kind...I could go on and on! Plus, this is a word that can change meaning throughout the year when I need to add or subtract things that I need to "BE."
I used Tombow and Alcohol markers to paint my word onto Strathmore 300 series, 140 lb watercolor paper. This paper takes the Tombow markers and water beautifully!! I then glued this to a canvas painted with Luminart Silks paint.
There you go...my one little word for 2013...to hang on the wall of my studio and to remind me to be more centered throughout the year 2013!!
Won't you join me and paint YOUR one little word as a reminder to resolve what matters most to you?
I know that if you have read any of my past blog posts, you are probably
scratching your heads by now and asking; what in the heck is "Color Love 101?"
Well.... "Color Love 101" is a super fantabulously fun on-line art class given
by the very talented and most generous mixed media artist, Joanne Sharpe.
If you are not familiar with Joanne's art, you should mosey over to her blog,
Whimspirations, and take a look. I promise that you will not be disappointed.
In her work, Joanne uses lots of bright delicious colors and artistically creative
hand lettered words that speak from the heart. (Something that I am not
very good at. Sigh!) You may have even seen her work before...she is
licensed in the craft and giftware industry and is best known for
her colorful and whimsical art work.
Journal made in "Color Love 101"
I have taken all five of Joanne's classes: " Letter Love 101, Artful Alphabets, Color Love 101, Magical Marker Mystery Tour and Bling It On." I loved them all!!!
Joanne's classes are the first classes (that I took) to use Facebook for creating a community of other artists taking the class. This has been a valuable tool for students to share artwork, tips, techniques and even "shopping alerts." And boy... do we ever love to shop for art supplies.!!! Since taking these classes, I think that I now own every conceivable type of watercolor paint, marker, spray paints, inks and dyes, as well as any blingy metallic paints on the market....and I use them all!! Including many that I already had that sat for years because I didn't know what to do with them. Thanks to Joanne...all that has changed.
I would highly recommend that anyone wishing to take an on-line class for the first time to find one that is self paced (Joanne's classes are open forever which gives you lots of time to complete the course or to go back at a later date to revisit a lesson) and one that allows for interaction with other students. You can learn LOTS from your fellow classmates.
I am not paid or compensated in any way to promote Joanne's classes. I just think highly of her as artist and educator and would love for others to experience the artistic growth that I have from taking her classes. If you are interested in learning more about her classes, there is a link located at the lower right column of my blog.
Here is a sample of some of fun things that I made in her classes:
Manda from Student Bonus lesson in "Color Love 101"
"Magical Marker Mystery Tour" Journal cover
Making Skinny Letters in "Magical Marker Mystery Tour."
"Color Love 101 Journal with "Bling It On " embellishment
"Bling It On" embellishment
Dimensional paint and Twinks embellishments made in "Bling It On"
Glass ornament painted in "Bling It On"
Lesson for "Letter Love 101" made with letters learned in "Artfully Alphabets"
One final word....I am so glad that I took ALL of Joanne's classes because what I learned in one class, I was able to use in the next! I am by no means finished with any of the classes but I know that I can take as long as I need to complete the lessons. Besides....the art friends that I have made all seem to travel together and are so supportive of one another....it makes for an exciting and fun experience!!! I know that we will stay connected for a long time!
Hello everyone! Welcome to my brand new blog! I have a lot of interesting projects coming up.... so keep checking back.
READY TO PLAY WITH TAPE?
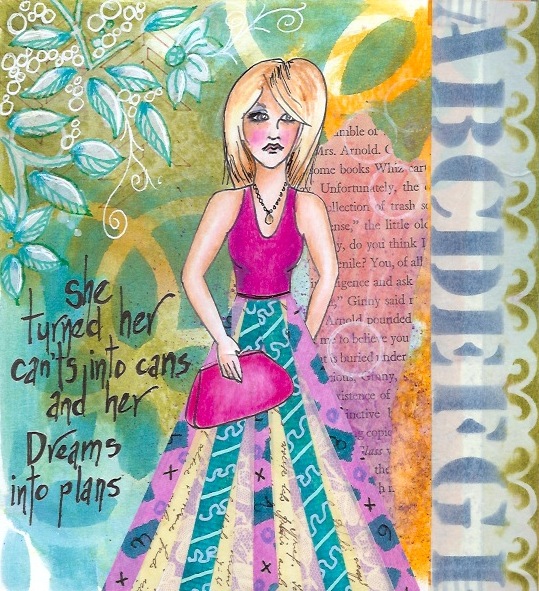
This is a continuation of the previous post. The previous post provided instructions for making your own tape. For this portion of the lesson we are going to make "She Art" girls, Julie Nutting style, by either using tape that we made, store bought tape or you can even use cut strips of paper and glue. You choose!
What are we going to make? We are going to make a "She Art" girl and dress her in a skirt made of tape. So let's get started!!!
GENERAL INSTRUCTIONS:
Prepare substrate: Prepare a substrate by using your media of choice. Use stencils, spray inks, watercolor, or even add collage ephemera, etc. to your background. If you choose to collage material to the background, be careful that it does not compete with your girl. I collaged book pages to mine......very subtle.
Draw girl: Next draw your girl in pencil on a separate piece of white paper. Use sketch or printer paper if you plan to use prismacolor pencils or watercolor paper if you plan to use water based paint. Once you have obtained the desired look, outline your girl by using a black or sepia color ink pen.
Color girl: Using the media of your choice, color the girl from the waist up. Do not color the skirt because we are going to apply tape to it! Also, if you have details positioned in front of the skirt like a purse or flower, it is a lot easier to add them separately after the skirt is layered with tape. Do draw and color arms and hands that are located in front the skirt.
Cut out girl: After girl is colored, carefully cut her out. Cut around any arm and hand positioned in front of the skirt and bend them out of the way.
Glue girl to substrate: Glue girl to the substrate except for the arm and hand that you cut around (the one that is in front of the skirt). Just kind of bend it back out of the way. We will glue it down after the skirt is completed.
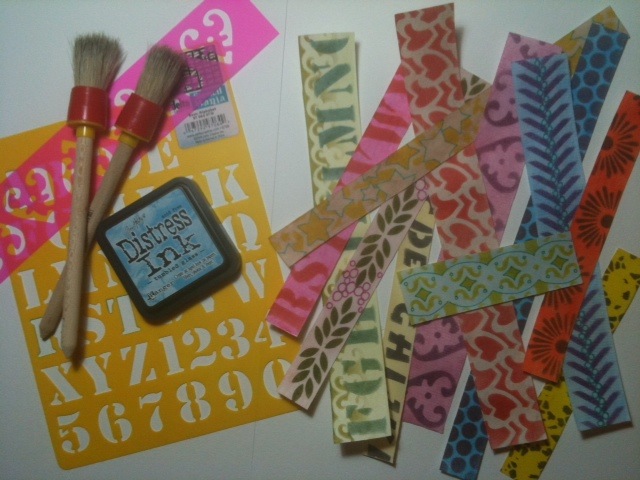
NOW.....Let's make skirts by using tape! This is where you need to make a decision. Which tapes will you use? Use washi or handmade tapes made with Sookwang and tissue paper for a soft almost chiffon look, use opaque tapes for a striped effect or a combination of the two? How many different tape patterns and colors will you use? (I only used three different tapes patterns for the green skirt and four different tape patterns for the girl with the teal and magenta skirt.)
I have included pictures of the skirts made with seni-transparent and opaque tape to help you make your decision.
Made with semi-transparent tape: This skirt was made by using semi-transparent tape made with Sookwang tape. Notice how the overlapped areas create another color and pattern? This skirt almost has a chiffon look. Store bought washi tape and cut strips of semi transparent paper will give a similar look.
Made with opaque tape: This skirt was made from tape made with the Ace Hardware and Walmart brand tapes. It is opaque and has a striped look. Can you see the difference?
Once you have selected the tapes you plan to use, prepare them by cutting strips 1/4 inch wide by the longest length of the skirt. Give yourself a little wiggle room and cut them a bit longer. Once they are positioned into place you can cut them along the bottom edge. (Wouldn't it be cute to make a short skirt with a handkerchief hem?) Tip: If you are using Washi tape or a tape that does not have a paper backing, first stick the tape to wax paper and then cut it into 1/4 inch strips.
Now.... lay the tapes side by side to determine the order in which you are going to use the tapes and let's start sticking them down. Starting at the outside edges of the skirt, stick down the first pieces of tape. Next, stick down the one in the middle and the one in the middle of that. Continue sticking down tape until all the white space is filled. Tip: If you are having a problem with getting the tape to separate from the paper backing, use a craft knife to peel the back the edge.
ADD THE FINISHING TOUCHES:
Once all the tape is stuck down it is time to glue the hand and arm that was folded back and any accessories to the skirt. Then complete your page with beautiful embellishments and lettering. Add tape to the background if you wish to do so!
There you have it! A "She Art" girl with a skirt made of tape.
THE COMPLETED "SHE ART" GIRLS:
The squares in the background are doodled homemade tape made from Sookwang tape.
The tape on the right side of the page is stenciled and made from the Ace Hardware tape.
.
USING TAPE TO JOIN JOURNAL PAGES:
Here are a few more examples of how to use your homemade tapes. Remember the journal that we made in Joanne Sharpe's Letter Love 101 class? (If you haven't taken the Letter Love class yet, see what fun we had?) I have made several journals using Joanne's method of taping different sized inky pages together and plan to make many more. I just love how the tapes coordinate with the pages and this wasn't planned. It's just that I have made lots and lots of tape and now have a huge assortment in which to choose from. Wouldn't these make nice gifts for your art friends?
I Hope that you enjoyed this lesson and now have a better understanding of how to make your own faux Washi tape and a few different ways to use them.
This is going to be a blog about making mixed media art, visual journaling, and jewelry making. So I hope that you enjoy my posts and come back often to share in my joy of making art!
I originally started this blog in order to post a Bonus Lesson for the Joanne Sharpe, Color Love 101 class and then decided that it would be an excellent way for me to hone my skills and share that experience with others. I have always had the desire to create with paint, paper, metal, found objects or anything else that happens to make its way into my art pieces.... whether it be a painting, assemblage, or piece of jewelry. It is my hope that this blog helps to inspire others to find their joy in creating masterful pieces of art.
Before I go on, I must thank all those very, very talented artists out there who so generously share their art processes and techniques with anyone who has the desire to learn. You have inspired me to try different art tools and techniques, to be BRAVE and EXPERIMENT......that there are NO RULES! It is because of YOU that I am a better artist today! Thank you....and I hope that I can pass this on by sharing my techniques and processes with those who also have the desire to learn.
So let's get started and share our experiences together....our JOY OF ART!
COLOR LOVE 101, BONUS LESSON#37 - MAKING FAUX WASHI TAPE
Making your own Washi tape is a great way to coordinate the tape color and pattern to your pages. It is a lot cheaper than store bought Washi tape and you can obtain different effects and make tape for specific applications. You can make tape that is semi-transparent or opaque, tape just for decoration or tape that is sturdy enough to withstand punching and stitching. Part two of the lesson, making "She Art" girls, will explain some of the differences.
Are you intrigued by my reference to "She Art?" Come back next Tuesday to see how we are going to use tape to make "She Art." Hope you enjoy this lesson!
LET'S MAKE FAUX WASHI TAPE
I am not going to reinvent the wheel here, Julie Ebersole for Ellen Hutson has a very good video to show you how to make your own Washi Tape and Ellen even sells the Sookwang Tape to make it. Hooray!!! And....they have all the different widths! I am so excited because I ordered mine off the internet and it took over two weeks to arrive. I later found out it came all the way from Japan!
Watch the video and then I will go over the different tape options for making the tape.
In the video Julie uses Be Creative Tape, AKA Sookwang tape, which is a double sided tape that is semi-transparent when covered with a transparent or semi-transparent tissue. One advantage to using the Sookwang tape is that it will tear if you want the end to look torn as opposed to a cut end. Be warned!! This tape is very sticky and cannot be repositioned like the real Washi tape. So where you stick it...it is stuck forever!!! Sookwang tape is my choice for making faux washi tape that is closest to the real thing.
TWO ALTERNATE TAPES:
The two tapes pictured below are tapes that you should be able to find at your local hardware or big box store. Both tapes come in 1.41" width which can be cut down if you prefer a narrower width. I like the narrower width if it is for decorative purposes but I leave it as is when using it as a binder to join two journal pages together.
The first tape is a tape that I buy from Ace Hardware: It is a very thin plastic, double stick carpet tape that costs about $4.50 a roll. This is a nice general all purpose tape that will work well for decoration and for binding your own journals. Although, I would not use it for stitching the spline of a journal as I believe that once it is pierced, the tape will continue to tear. This tape is very sticky and unlike the Sookwang tape, it is opaque and will not tear. However, it is possible to fake torn ends by cutting it in a haphazard manner. Here is a picture:
The second tape is also a very thin plastic, double stick carpet tape that costs about $5 a roll. It is available at Walmart and is made by the Duck Tape brand. It too is a a nice general all purpose tape that will work for decoration as well as for binding your own journals. The main difference is that this tape has threads running through it which makes it ideal for stitching a spline. It's kind of like a thin Duck Tape. Hey! It is Duck Tape!!! This tape is also very sticky, is opaque and will not tear. It has the look of paper fabric.
Here is a picture:
WHAT KIND OF PAPER TO USE:
I prefer a good white tissue paper if I am going to color and doodle, stamp or stencil my designs. You can even use printed paper napkins which I will explain and show how to use later. The tissue paper that I use is just ordinary gift wrapping tissue (not the shiny kind). You may want to first do a test strip to make sure that your paper and pens are compatible and that the ink does not bleed. Not all tissue paper is of the same quality. Of course you can use pre-printed tissue paper, fabric tape, or thin wrapping paper. The choice is up to you. Experiment!
GENERAL TIPS:
Do not use paints with a high water content. Water is not compatible with tissue paper.
Don't worry if the tissue paper has small wrinkles in it after you stick it to the tape. Just burnish them out by using the back of your fingernail.
Do make tapes for writing text lines. Consider plain, lined notebook and grid paper.
Try punching borders on tape. (Tape from Walmart does not punch well.)
Use Odorless mineral spirits or Gamsol to clean the glue off your scissors.
DOODLED AND ZENTANGLED TAPE:
Just like the video shows, I stick a strip of white tissue paper to the sticky side of the tape and trim it. Then using alcohol markers like Copic, Letraset Promarkers or Prismacolor markers, I color the length of tape with the background color. Next, I doodle or zentangle the design using Pitt, Micron, gel pens, Zig or alcohol markers. Don't forget gold and silver paint markers. It's just that simple!
Here are a few of the doodled and zentangled tapes I that made:
STENCILED TAPE:
Just like the doodled tape, I start by making the tape with the tissue paper and then color the background color with alcohol markers. That is, if the background is to be other than white. In order for the stenciled color in the next step to show, make the background a light to medium color. Next, position the stencil over the tissued tape and using a Ranger Distress Ink Pad and a soft natural brush, swirl the brush over the ink pad and then over the stencil. You can layer several stencils and colors over the tape this way but keep in mind that where the inks layer, the colors will mix.
Note: Do not wash your brush between colors. Water is not compatible with the tissue paper. To clean the brush between colors, wipe the ink off the brush by brushing it onto a paper napkin.
Here are a few of the stenciled tapes.
USING PRINTED PAPER NAPKINS:
Using printed napkins is so much fun and even LESS time consuming than making the doodled or stenciled tape. And I promise you that you will become hoarders of NAPKINS! I have a friend that I trade napkins with or my addiction would be worse. Hey! What about a napkin swap or tape swap? Anyway, back to the instructions. Paper napkins come in two or three ply and first need to be separated before sticking it to the tape. An easy method of doing this is to use two pieces of tape and stick a "handle" to each side and pull.
Once separated, just stick the printed napkin to the sticky side of the tape and trim.
Here are a few of the tapes I made by using napkins:
STAMPED TAPES:
I won''t go over how to make stamped tape as I think the video does a excellent job of that and don't forget that you can stamp and then color part of the design with markers for an awesome look!
COMING UP NEXT.....WHAT ARE WE GOING TO MAKE WITH OUR WASHI TAPE? The remainder of the lesson is to be posted on August 28th. Come back even if you didn't get a chance to buy tape supplies. This lesson will work with store bought Washi tape or even cut strips of paper and glue. Stay tuned........