Showing posts with label Tombow Markers. Show all posts

Monday, October 28, 2013

HAPPY HALLOWEEN!

Have a very safe and fun Halloween everyone! 

I am going to stay home and pass out candy to the neighborhood kids and 
hope that all the candy is gone by the end of the evening so 
that I am not tempted to eat any! 
DARN DIET!!!!


I found this interesting guy in a magazine.  I can't remember the name of the candy bar he's advertising.  Anyway, for those of you who have Cricut machines...do you recognize the spider web, cat, fence and tree?  I think that it came from the Paper Doll Dress Up cartridge.  I cut it out years ago and just now find a use for it.  Since this journal page, I have incorporated several Cricut embellishments into my pages.  Finally....I have found a use for the Cricut machine (I am not a scrapbooker).

Hugs,
Ginny

Saturday, June 29, 2013

STAMPFEST ORLANDO!

I got up early today and went to Stampfest Orlando a rubber 
stamp/scrapbook/paper arts show that visits the Orlando area annually.  
This is one show that I usually don't miss...I love to see 
the hottest new products and check out the new techniques 
even though I am no longer into making cards with rubber stamps.   
I do, however, use a lot of the same supplies in my mixed media art 
and you never know what you might find that would prove to be useful.

This year there were 26 vendors and a guest visit from Tim Holtz.
Tim demonstrated many of the same techniques that he shows 
on the Ranger web site so nothing new there.  
The only new products that I noticed this year were the Wink of Stella Brushes 
and a lot of different variations of Liquid pearl type products.  
I came home with three new Tombow markers, 
three stamps for the back of the ATC's that I will be making and 
two Signo Uniball pens, one gold and one silver. 
Now I am ready for a cup of coffee and a nap!  I'm pooped!!!

Before I sign off...I drew a sunflower and painted it with TombowMarkers 
for a friend that is going through some difficult times.  
I hope that it cheers her up.  Five of the ladies in my Art Group are
doing the same so I hope that this will perform it's magic!!!


Until next time!

Hugs,
Ginny

Wednesday, June 26, 2013

PAINTED ARTIST TRADING CARDS

I have never made an ATC!!!  No never!!!!  I really don't know why...maybe because I see the small size as limiting or the thought of trading art work with other artists never occurred to me...or whatever was stopping me before...it is not stopping me now.

If you have been following my blog for very long you probably know that I have taken every single one of Joanne Sharpe's on-line classes.  Yes, all of them and I am not alone...so have many others.  And...after a while, you become pretty good friends with the other artists and become inspired and even influenced by them. That's how I became involved in ATC's.  One of the artists in Joanne's class started a closed FaceBook group to trade ATC's.  So....I thought that I would give it a try! "Nothing ventured, nothing gained."

To get started I cut up scraps of watercolor paper to size, grabbed my Tombow markers and various other pens and pencils and got to work making ATC's. Whenever I get stumped for ideas of what to draw, I always turn to faces.  Faces are the most comforting to me, especially when you are not trying to draw anyone in particular.  And...because of the small size of the ATC's, I thought that I would draw just part of the face and feature the hair by painting it bright colors like blue, green or pink.  Here is the first of six that I made.


And this is how I made them.

I used:

Strathmore 300 Watercolor paper
Tombow watercolor markers
Prismacolor pencils
black Pitt pen, fine
Acrylic Paint marker, Painter's
Signo Uniball white pen
Koi waterbrush
White charcoal pencil
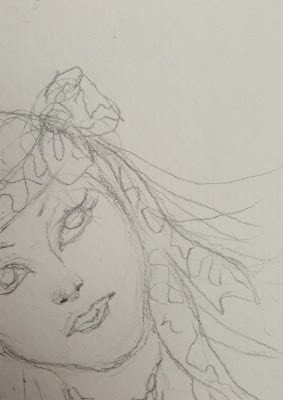

Lightly draw the girl in pencil.

Note:  Use a good quality watercolor paper because the Tombow markers will not blend on an inferior paper.

Using the Tombow markers, color areas of the paper.

Do not color the area solid as we are going to move the color around with water from a water brush or paintbrush. This will give it a nice watercolor look.

Be careful not to let the areas touch while wet unless you purposefully want the colors to blend.

I wanted the purple and turquoise to blend for the background but I did not want them to mix with the green hair. One way to avoid one color from bleeding into the adjacent color is  to let each section dry before you paint.

Blending the colors with a wet paintbrush or waterbrush.

Wet the areas of the Tombow paint until it starts to flow and then push it around to cover the desired area to be painted.  If you have to scrub with the paintbrush, you may not be using enough water. At the same time, be sure to get rid of the hard edges.

This may look a little watermarked or splotchy.  If you don't like the way it looks, re-wet the area and push the color some more.  This takes a little practice but also keep in mind that watercolor is supposed to be watermarked. Also, don't worry too much about a smooth background because it will be covered by the lettering.

See how the purple and turquoise is not completely mixed together?  I was striving to blend the hard lines but still allowing both the purple and turquiose to maintain their true color.  I was not trying to obtain a new color by mixing the two.

Leave some white paper showing in the area of her nose and chin...areas that you wish to come forward.  The areas to recede are darker in color.  This gives the face its rounded shape.
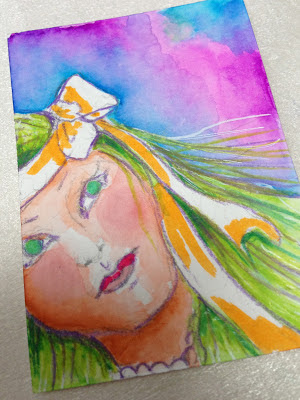

Now to add detail.

I used a medium purple Prismacolor pencil, Violet 1008, to start outlining the features of the face and to streak the hair.

I used a deeper green prismacolor pencil and a white Signo pen to add additional streaks to the hair.  I also added shading to areas of the hair that would appear under her face or scarf.

I added color to the eyes, lips and scarf with Tombow markers.  
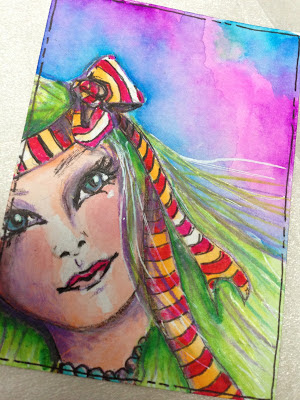

In this step, I have deepened the shadows with prismacolor pencils and used a black Pitt pen for detail.

I used the Pitt pen to draw the stripes in the scarf,  accentuate the facial features and necklace, and draw a border around the edge of the card..

I added a dot of white highlight to the eyes and bottom lower lip and added more hair streaks with the Signo pen.

The red stripe on the scarf is Tombow marker.


The final step is to add the lettering.

I used a white charcoal pencil to draw the placement of the letters.  This later erases beautifully using a kneaded eraser.

Next, using a fine tip paint pen, draw the letters.

Once the paint is dry, outline the letters with a Signo pen.

Once all pen work is dry, erase any visible charcoal lines.


I hope that you enjoyed this tutorial and give it a try!!!  I welcome questions!


Hugs,
Ginny


Here are a few more ATC's using this technique.


Sunday, February 3, 2013

FEBRUARY CALENDAR PAGE

Running a little behind...I have so much to do and keep adding more to my plate. My goal for today is to catch up with my calendar journal by finishing the January journal entries so that I can move on to February.  I'm almost there!!!  At least I have the February page completed and ready for the journaling to be added.


This is how I made the February page:

I used Dylusions sprays for the background and date squares and Tombow markers for the basket of hearts and the background behind the heart basket.  I was pleasantly surprised how the yellow Tombow marker matched the yellow color of the Dylusions and how well they blended together.


The basket of flowers is a on a fold-out page.  When closed, you can see the quote that was part of the January page.  I planned the February page first so that the shape or cut-out would follow the shape of the hearts....then I made the quote page fit the shape.


The basket is made by using a Zentangle pattern.  It looks hard but is easy peasy. A little time consuming but easy just the same!  Here is how you do it:


Next up...MARCH!  Hmmmm....I'm thinking March flowers!  March is the month to plant flowers and vegetables in Florida.  Maybe I will fill the page with lots of flower doodles.

Until next time!
Hugs!!!!
Ginny

Friday, February 1, 2013

HAPPY BIRTHDAY JOANNE SHARPE!!!

Today is Joanne Sharpe's Birthday (30 again...right Joanne?) 
and today is also the debut of her sixth on-line class, Letter Love 201!  
By now, Joanne has amassed a huge following of art enthusiasts 
who desire to learn all they can from this gifted artist...and 
we will all be there for Letter Love 201 in wild anticipation to learn 
MORE!!!!!!  
Won't you join the fun?

HAPPY BIRTHDAY JOANNE!!!


I used Tombow Markers, Neocolor II, and Peerless Watercolors with a little glitter glue for sparkle.


Hope to see you in Letter Love 201!!!

Until next time, 
Hugs!!!
Ginny


Sunday, January 13, 2013

JUST ONE LITTLE WORD


I recently joined a challenge suggested by one of my on-line classmates, Ann Kristen Krier, to pick one word to summarize my intentions for the year.  This word would be used to remind me of things that I need to resolve or work on in my life.  It is like making a News Years Resolution but only expressing it in one little word.  We were to paint our word using the techniques that we learned in Joanne Sharpe's "Letter Love 101" class.

My one little word to focus on for the year 2013 is "BE."  I can't take complete credit for this as I originally had another word picked but when Joanne Sharpe posted her word for the challenge, "BE"....it hit me right between the EYES!!!  This word says everything that I wanted to say...Be tolerant, Be generous, Be grateful, Be happy, Be kind...I could go on and on!  Plus, this is a word that can change meaning throughout the year when I need to add or subtract things that I need to "BE."


I used Tombow and Alcohol markers to paint my word onto Strathmore 300 series, 140 lb watercolor paper.  This paper takes the Tombow markers and water beautifully!!  I then glued this to a canvas painted with Luminart Silks paint.

There you go...my one little word for 2013...to hang on the wall of my studio and to remind me to be more centered throughout the year 2013!!

Won't you join me and paint YOUR one little word as a reminder to resolve what matters most to you?

Until next time!
Ginny

Tuesday, September 11, 2012

ANOTHER MIXED MEDIA GIRL

Wow!  I have so many things to blog about and I am sure that once the novelty of having my own blog wears off, the posts will be less frequent but until then.....I will keep on posting!!!!

Also, I must tell you that I recently discovered the TV program "Doc Martin" and have become ADDICTED!!!!!   And.....I have this beautiful 23" computer monitor in my craft room from which I can watch all the episodes and draw at the same time!!!  I'm feeding two addictions at the SAME time!  How great is that????

MIXED MEDIA GIRL:

This is another mixed media face that I painted using Tombow markers, and Prismacolor pencils.  The background was made by using Derwent Inktense pencils with a layer of Ranger Distress Ink stenciled on top and a few doodles.

I took a picture of the first layer of medium....the face and dress painted with Tombow Markers and the background painted with Inktense pencils.  Hopefully, this will show you how the painting can transform from what I call "the ugly stage" into something of beauty.  So.... don't panic if the girl looks a little jaundiced!!!  This can be fixed with the application of Prismacolor pencils.


Now, here she is after a layer of Prismacolor pencil was added to her face; the stenciling, doodling and lettering added to the background and the other fine details added like her glasses, and heart headband.


So...."Don't Worry, Be Happy."  You can easily correct the color of your girl!


Sunday, September 9, 2012

MIXED MEDIA FACE


This girl was painted on watercolor paper using Tombow Markers with a wash of water, Koi watercolor, Prismacolor pencils and Pan Pastels.  I like the combination of the smooth blending that the Prismacolor gives with the painterly look of the Tombow Markers and koi watercolor.  I also like that it does not have the hard edge of a black ink pen.  This is a new technique that I learned from a very talented classmate, Linda Moore, from the Joanne Sharpe, Color Love 101 class.  Linda made a great youtube video demonstrating the process.   Here is the link:   http://www.youtube.com/watch?v=KWCKTAKJBdk  I know you will love it!

Notice the homemade faux washi tape?  I have gobs of it and try to use it whenever I can.   The text blocks are tape made from using old receipts.