Monday, September 10, 2012

REPEAT THE FOLLOWING S'IL VOUS PLAIT:

I am working in my altered book journal again and this time I decided to do a little collage work.  I have this beautiful hand stamped paper that I rarely use....only because inspiration doesn't hit me.... and I also have bits of ephemera and handmade Washi tape that looks gorgeous with the stamped paper.  Boy...that handmade faux Washi tape has really come in handy!  I seem to be using it in everything!!!  Many times it is just the right accent to add interest to a page.

This is how I made this page:    I scribbled and then rubbed Faber Castell Gelatos over the entire background.  Because the book paper is slick, they moved around with no problem,  No need to add water!!!  Then I started gluing the hand stamped paper and ephemera.  I did a little stenciling with the Gelatos, a chevron design, but covered up most of it with the final layers.


Now it is time to start doodling and adding Zentangle patterns with alcohol markers.  I used Prismacolor markers and fine line Sharpies because the vivid colors do so well on the book paper.  I also own Letraset Promarkers but the colors didn't do as well.  When I applied them the colors seemed a little washed out and they seemed to bleed a little.  I had to experiment with my pens to find the ones that worked the best.  Then I added lots of handmade Washi tape, the text blocks, and white pen accents.  There you have It.....


Just in case you can't tell which is the handmade Washi tape; the ticket and center of the tall flower is tape made from dinner napkins.  The green dotted flower center, the pink and red dotted tape,  the purple tape with squiggles, the blue tape with squiggles and the green and blue chevron design are  all faux Washi tape doodled using alcohol markers.   

Hmm......I wonder if you would get this hand drawn look if you used commercial Washi tape?   

Sunday, September 9, 2012

MIXED MEDIA FACE


This girl was painted on watercolor paper using Tombow Markers with a wash of water, Koi watercolor, Prismacolor pencils and Pan Pastels.  I like the combination of the smooth blending that the Prismacolor gives with the painterly look of the Tombow Markers and koi watercolor.  I also like that it does not have the hard edge of a black ink pen.  This is a new technique that I learned from a very talented classmate, Linda Moore, from the Joanne Sharpe, Color Love 101 class.  Linda made a great youtube video demonstrating the process.   Here is the link:   http://www.youtube.com/watch?v=KWCKTAKJBdk  I know you will love it!

Notice the homemade faux washi tape?  I have gobs of it and try to use it whenever I can.   The text blocks are tape made from using old receipts.   


ALTERED JOURNAL - ANOTHER FACE

This is another Prismacolor face that I had done in a much larger scale and decided that she needed to go into my altered book journal.


I also decided that this was going to be a two page spread and to include the quote:  

"Be content with yourself just the way you are.  Let this knowledge settle into your 
bones and allow your soul to sing, dance, praise and love."  

Oops, lost track of who said that or I would give them credit.  Guess that I will need to do some research.   

This is how I made it:  There were two photos on the page that I decided to cover up by gluing a torn map over them.  Then I sprayed blue Smooch and Black Dylusions in certain areas and mopped slightly.  Let dry.  Then I dabbed White and (red) Barn Door Distress Stain on the page, misted it with water and allowed it to bleed and drip.  


Then using a stencil, Soot and Mustard Seed Distress Ink pads and a brush, I stenciled the checkerboard squares and misted slightly.


Using white gesso and a circle stencil, I created some texture, outlined the circles with a black pen and added dots of Barn Door Distress Stain.  Then I added some of my homemade faux wash tape, glued the girls face, added more faux washi tape, the lettering and I'm done!


Hope that you enjoyed this and that it inspires you to try drawing faces using Prismacolor pencils.


Saturday, September 8, 2012

PAINTING FACES

I just love drawing and painting faces.  If I can't think of anything to draw, I will rough out a face in pencil on plain paper and color it with Prismacolor pencils. Eventually, the colored pencil drawing will make its way into one of my journals.

Lately, I have been experimenting with using different mediums as well as creating different whimsical looking faces.  I tried drawing faces with cute short turned up noses and long faces with long noses... girls  with big eyes and some with squinty eyes..... tiny full lips and wide thin lips.   Can you tell that I looooove to draw faces?  It is so much fun to see the personality of each girl develop right in front of your very eyes and on a piece of paper!!  Very addictive!

My technique for colored pencil faces is pretty much the way everyone else does it.  First using a lightweight paper (I use a good quality inkjet printing paper but any smooth paper or card stock will work) I lightly sketch the face, hair and upper portion of the body and clothes and then ink it using a micron or pitt pen.  Next, I erase all the pencil lines.

To apply the colored pencil for the first layers, I use a medium pressure with small circular motions.  First, I apply the lightest color (light peach) to the face leaving any white or highlighted area.  Next, a slightly darker color (peach) is applied for contouring around the perimeter of the face, nose, eyes and lips.  For the final and darkest shading, I use the darkest color (burnt ochre) around the perimeter of the face, side and bottom of the nose (not as much as the previous layer).  

Now I am ready to blend it all.  Blending is done by using the lightest color or white and going over the entire face by using a more firm pressure than what was used on the first and previous layers.  Once again in a small circular motion. What begins to happen is the wax from the pencil begins to move around the paper and blend into the lightest color...... eliminating the grainy look of the pencil marks. I may need to repeat the contouring process if the contour is not dark enough but the idea is to build the layers slowly.

The cheeks are added by using a rose color in a circular motion with the darkest and firmest pressure in the center of the cheek and fading to a lighter pressure and color on the perimeter of the apples of the cheek.  Once again, I blend with the lightest skin color or white.  That's pretty much the short of it!!

Here is one of the girls colored with Prismacolor pencils.  The background was made by using Faber Castell Gelatos with a wash of water.  After it dried, I rubbed the gelato stick over a stencil.


I hope that this inspires you to try coloring faces using Prismacolor pencils.  It takes practice but I think that it is well worth it!  Hope that you do too!


Monday, September 3, 2012

ALTERED BOOK JOURNAL USING ALCOHOL MARKERS

I tried painting a page in my "altered book journal" with alcohol markers, Copic, Prismacolor and Letraset Promarkers...right over a text page that was not gessoed and I like the results.  It didn't bleed through to the backside of the page too bad and I am confident that any bleed through can be gessoed over.  The markers went down smoothly like I was painting on bristol.


The black rectangular area under the purple flower was a B&W photo in the book that I painted over with markers.  You can't tell can you?  I think that it really adds to the overall interest of the page.  It would be flat and look all the same with out it.  You know what they say, "If you can't beat em...join them.  In this case I chose to "join them" and make the photo area part of the design.  The black polka dot washi tape also helped to balance the page.

ALTERED BOOK JOURNAL - MY FIRST ENTRY

I have always been fascinated by journals made from old books....the way the text and pictures peek through the artist's work.  So you can imagine how excited I was when at a Library sale I found a 7" x 10" old forgotten ART book.  Just the right size for journaling.  Not too small and not too big.  Just right!!!  The book is titled "History of Art for Young People."  It has a beautiful sturdy cover that I will eventually embellish with fabric, lace and some of my art creations.... that I will somehow transfer to fabric.  I haven't decided yet what transfer method I will use.


The first thing that I did to prepare the book for journaling was to remove all the colored artist's plates and then some of the text pages in order to make the book thinner.  This is necessary so the book will not be too thick after the pasted papers and embellishments are added.   Next, I lightly gessoed the remaining pages.......being careful not to cover up too much text. 


I think the next "old book" journal that I make, I might try to leave some of the pages without gesso and use alcohol markers on them.  The pages in my book are a very good quality semi-gloss paper and the markers bleed through very little.  If the bleed through becomes a problem I will either gesso the backside of the page or glue two pages together.

Now, I am ready to paint my pages!!  I probably will reserve this journal for the pasted handmade papers that I made last year in Deborah Cooper's class at 21 Secrets....maybe some ephemera and magazine cutouts that I have been saving just for this purpose.   I don't think that I will use any drippy paint techniques because I am not sure how the pages will take the wet solutions....but who knows?  Isn't visual journaling, after all, about being brave and experimenting?  We'll see where this goes!

This is a peek at the first page in progress.  I might add to it later.  This page was done with a somewhat  dry brush using Koi watercolors.  The lettering was done with a Pitt pen.


Let me know if you made this type of journal before and any highlights of the experience that you would like to share. 

Until next time,
Ginny


Saturday, September 1, 2012

BONUS LESSON #37 - PLAYING WITH TAPE


Hello everyone!  Welcome to my brand new blog!  I have a lot of interesting projects coming up.... so keep checking back.  


READY TO PLAY WITH TAPE? 

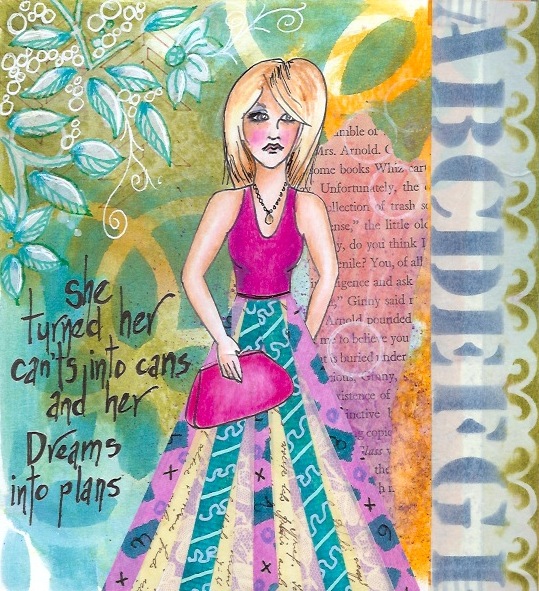
This is a continuation of the previous post.  The previous post provided instructions for making your own tape.  For this portion of the lesson we are going to make "She Art" girls,  Julie Nutting style, by either using tape that we made, store bought tape or you can even use cut strips of paper and glue.  You choose!

What are we going to make?  We are going to make a "She Art" girl and dress her in a skirt made of tape.  So let's get started!!!

GENERAL INSTRUCTIONS:
  • Prepare substrate:  Prepare a substrate by using your media of choice.  Use stencils, spray inks, watercolor, or even add collage ephemera, etc. to your background.  If you choose to collage material to the background, be careful that it does not compete with your girl.  I collaged book pages to mine......very subtle.
  • Draw girl:  Next draw your girl in pencil on a separate piece of white paper.  Use sketch or printer paper if you plan to use prismacolor pencils or watercolor paper if you plan to use water based paint.  Once you have obtained the desired look, outline your girl by using a black or sepia color ink pen.
  • Color girl:  Using the media of your choice, color the girl from the waist up.  Do not color the skirt because we are going to apply tape to it!   Also, if you have details positioned in front of the skirt like a purse or flower, it is a lot easier to add them separately after the skirt is layered with tape.   Do draw and color arms and hands that are located in front the skirt.   
  • Cut out girl:  After girl is colored, carefully cut her out.  Cut around any arm and hand positioned in front of the skirt and bend them out of the way.  
  • Glue girl to substrate:  Glue girl to the substrate except for the arm and hand that you cut around (the one that is in front of the skirt).  Just kind of bend it back out of the way.  We will glue it down after the skirt is completed.
NOW.....Let's make skirts by using tape!   This is where you need to make a decision.  Which tapes will you use?  Use washi or handmade tapes made with Sookwang and tissue paper for a soft almost chiffon look, use opaque tapes for a striped effect or a combination of the two?   How many different tape patterns and colors will you use?  (I only used three different tapes patterns for the green skirt and four different tape patterns for the girl with the teal and magenta skirt.)

I have included pictures of the skirts made with seni-transparent and opaque tape to help you make your decision.

Made with semi-transparent tape:   This skirt was made by using semi-transparent tape made with Sookwang tape.  Notice how the overlapped areas create another color and pattern?  This skirt almost has a chiffon look.  Store bought washi tape and cut strips of semi transparent paper will give a similar look.


Made with opaque tape:  This skirt was made from tape made with the Ace Hardware and Walmart brand tapes.  It is opaque and has a striped look.  Can you see the difference?


Once you have selected the tapes you plan to use, prepare them by cutting strips 1/4 inch wide by the longest length of the skirt.  Give yourself a little wiggle room and cut them a bit longer.  Once they are positioned into place you can cut them along the bottom edge.  (Wouldn't it be cute to make a short skirt with a handkerchief hem?)  Tip:  If you are using Washi tape or a tape that does not have a paper backing, first stick the tape to wax paper and then cut it into 1/4 inch strips. 

Now.... lay the tapes side by side to determine the order in which you are going to use the tapes and let's start sticking them down.  Starting at the outside edges of the skirt, stick down the first pieces of tape.   Next, stick down the one in the middle and the one in the middle of that.  Continue sticking down tape until all the white space is filled.  Tip:  If you are having a problem with getting the tape to separate from the paper backing, use a craft knife to peel the back the edge.


ADD THE FINISHING TOUCHES:

Once all the tape is stuck down it is time to glue the hand and arm that was folded back and any accessories to the skirt.  Then complete your page with beautiful embellishments and lettering.   Add tape to the background if you wish to do so!

There you have it!  A "She Art" girl with a skirt made of tape.

THE COMPLETED "SHE ART" GIRLS:


The squares in the background are doodled homemade tape made from Sookwang tape.


 The tape on the right side of the page is stenciled and made from the Ace Hardware tape.
.

USING TAPE TO JOIN JOURNAL PAGES:

Here are a few more examples of how to use your homemade tapes.  Remember the journal that we made in Joanne Sharpe's Letter Love 101 class?  (If you haven't taken the Letter Love class yet, see what fun we had?)  I have made several journals using Joanne's method of taping different sized inky pages together and plan to make many more.  I just love how the tapes coordinate with the pages and this wasn't planned.  It's just that I have made lots and lots of tape and now have a huge assortment in which to choose from.  Wouldn't these make nice gifts for your art friends?


I Hope that you enjoyed this lesson and now have a better understanding of how to make your own faux Washi tape and a few different ways  to use them.  

I can't wait to see what you do with tape!!

Your Color Love 101 classmate,
Ginny Markley