Okay everyone...GET YOUR APRONS ON!!!
We're going to collage and paint !
I told you that I would walk you through making a Teesha Moore type collage and share many tips that I learned from her in the class "Mermaid Circus." Well...here goes!
LIST OF SUPPLIES:
- Substrate...I like Mixed Media paper 140 lb. A heavy weight Watercolor or Bristol paper works also.
- Magazines and ephemera of all kinds.
- Matt Medium (I use Liquitex), Mod Podge or glue stick (Use a good glue stick one like Elmer's Photo or UHU, not School glue).
- Scissors
- Acrylic paint...craft paint or the more expensive variety. Any will do. My fave is Liquitex soft body acrylic in the small flip top bottles.
- Mister bottle filled with water.
- Two 1" wide flat paintbrushes. One to apply background color and a separate one to apply the Matte Medium.
- Acrylic paint pens. (Not oil based pens.) Extra fine and fine (1mm & 2mm). I like all brands..Elmer's Painter's, Sharpie, Sharpie Poster Paint, Molotow, Posca...to name a few.
- Gel Pens. I love the Gelly Roll Moonlight, Souffle and Neon.
- White Uni-ball Signo pen UM-153. (I buy these on-line by the box from Jet Pens). The best opaque white pen although the ink is not water resistant. If you need it to be water resistant, use an acrylic paint pen such as the 1mm Molotow. Good to have both.
- White charcoal pencil. Mine is General's.
- Kneaded eraser.
- Prismacolor Premier pencils for shading.
- Paper towels.
Tip: All types of glue have their pros and cons. The pro regarding Liquitex Matt Medium is that the Prismacolor pencil works well with it...the con is that it is very wet and the paper tends to wrinkle more than the other adhesives. The pro for Mod Podge is that it is easy to work with and wrinkles less but the con is that the Prismacolor pencil does not work well over it's slick surface. The pro for a glue stick is that the paper wrinkles less than the other two but the con is that it is difficult to apply to thin paper and larger pieces (it sometimes dries before the piece is applied). It takes practice and a little experimenting to find which adhesive works best for you.
Tip: A word about pens. I only use acrylic paint pens and gel pens over acrylic paint, matte medium or Mod Podge. I have ruined many a Micron, Pitt, Copic or other type of alcoholic marker by using them over acrylic paint and dried adhesive. It is also useful to know that gel pens are not water resistant and should be used last. Do not paint the matt medium or Mod Podge over the gel ink as it will dissolve the ink and smear. If this happens, use a damp paper towel to carefully wipe it off and start over (before it dries assures good results).
Tip: A good white and black liner that is permanent when dry and writes on most surfaces is the 1mm Molotow. These are also refillable.
PREPARING THE SUBSTRATE:
Squirt a little acrylic paint randomly on the paper. I may use two or three colors for this purpose. Keep the paint in the same color family or use analogous colors (next to each other on the color wheel). Do not use complementary colors or they will make mud. If you wish to use complementary colors just don't mix them together...use them side by side with minimal overlap or wait until the first color is dry.
After the paint is globed on the paper, mist the page lightly with water and then quickly paint and blend to cover the entire page. Just as quickly, grab a paper towel and rub the paint in a circular motion to create a smooth finish. (I learned this from Teesha.) Don't worry if it is not completely blended...most of the background will be covered with collage and what doesn't get covered, the little imperfections will add interest.
TIP: Teesha paints both sides of the page before she begins the collage work because wetting the back side of a finished collage with paint or Matte Medium may loosen the glue on the collaged side. (Why this never occurred to me before is beyond me!!!)
I paint both sides of several pages at one time...then do the college work on all the pages...and then embellish them when the mood strikes. I found it interesting that Teesha takes her work with her to the coffee shop and has several pages collaged and ready to embellish with doodles and markings. That way you only need to carry pens and pencils in addition to the collaged substrate. I haven't tried this yet but I plan to! Starbucks...here I come!!!!
FINDING COLLAGE MATERIAL:
Collage material is everywhere and needn't cost much. Here are some to consider:
- Magazines of all kinds. Look for colors and textures that you like as well as graphics and photos.
- Used art books or children's books.
- Wrapping and scrapbook paper.
- Printed paper napkins. These are three ply and need to be separated...only use the top and printed layer and use spray glue or gel medium to apply (they tear easily if the glue is too wet). Also, they are somewhat transparent so keep that in mind when layering over other collaged pieces.
- Your own printed papers. Gelli mono prints are great for this.
- Prints of your own art work.
- Prints of non-copyrighted art or photos.
- Free or purchased collage sheets.
- Ephemera such as old letters, photos, ticket stubs. candy wrappers, etc.
Tip: Teesha also recommends for their graphics...magazines such as, IND, 3X3, Hi-Fructose and foreign fashion magazines.
ORGANIZING YOUR COLLECTION OF COLLAGE PAPERS:
Now is a good time to talk about organization and how to store your collage papers. It would take way too much time to look through each magazine, book, etc. each and every time that you plan to collage. You must have a way to store and organize your papers. Whether you store and separate them in boxes or folders, find a system that works for you.
This is how I collect and store my papers: When I am finished with a book or magazine, I rip out the pages with interesting colors, textures and pictures keeping in mind how I might use them. For example, I might like the colors used in a magazine advertisement or the texture of a piece of clothing. These can be cut into shapes or used as boarders. I also cut out people and use the whole person or just a body part like a head, arm, leg, feet or hands. I also cut out any graphic or picture to use in it's true form, like a flower, shoe, purse, cat, dog, etc. Do you get the idea?
I separate and store my pictures in folders. These are some of the various categories by which I store my stash: Faces, Body Parts, Adult People, Children, Birds, Animals, Made Paper, Ephemera. Colors and Textures, Quotes, Words and Phrases, Famous Artist's Paintings, and Floral.
By filing my collage material this way, inspiration is only a folder away. I can look through a folder and always find a clipping by which to build a journal page around.
SELECTING COLLAGE MATERIAL:
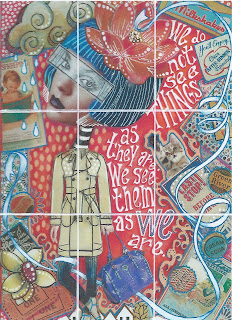
First, I find my focal piece. In the collage of the girl in a raincoat, it was her big head with the blue hair. The next step was to build her body. I auditioned many magazine clippings until I finally decided on the raincoat. Next, I found her hands and legs in the "Body Parts" folder. See? If you have a filing system, it is easy peasy to find what you are looking for. I didn't have to thumb through several magazines.
Once the girl was decided, I started looking for ephemera and paper with the textures and colors that would go with the girl and background. I pull everything that might work and make the final decision later.
CREATING THE COMPOSITION:
I audition many pieces until I find the combination that works well together and then make the final cut and start laying out the composition. Don't put too much time and thought into this as when you start your mark making/doodling...things will really begin to change and that little piece of paper that you were fretting over...fades away.
There are, however, some basic rules that I like to follow. The first is that I like to repeat colors and patterns in more than one location on the page...second, I like to vary the size of the collage pieces (large and small) and third, I do not like to center the focal piece. I just feel that for ME...following these rules makes the page more interesting.
RULE OF THIRDS (Optional)
Rule of Thirds: Do you notice how I positioned the girl toward the left side of the page? I did this because I needed to leave room for the lettering and also because I like to use the "Rule of Thirds." In case you don't know what this is, it is a rule of composition that many artists and photographers use because it is believed to create more energy and interest. Wikipedia explains the "Rule of Thirds" as: "The guideline proposed that an image should be imagined as divided into nine equal parts by two equally-spaced horizontal lines and two equally-spaced vertical lines, and that important compositional elements should be placed along these lines or their intersections." The most important element in my composition is the girl's head so I positioned it toward the left and top third of the imaginary grid.
I only mention the "Rule of Thirds" because if you are having difficulty with the layout of your page and you are not liking it so much...try the "Rule of Thirds." It might change everything! However, if you are happy with the focal piece being centered...there is nothing wrong with that too. In Art Journaling...there are "No Rules." What matters is that YOU like it and are having fun with the process!
I do need to say, however, that Teesha has some spectacular art work where the focal piece is CENTERED! See? Just my personal preference!
GLUING THE COLLAGE PAPER TO THE SUBSTRATE:
When you are happy with the composition...start Trimming and gluing!
Tip: With so many pieces to glue...how do you remember your final layout and where to glue the pieces when you need to remove the pieces on top in order to glue the bottom pieces? Simple...take a picture!
Now...If you have never used Mod Podge or Matte Medium to glue collage pieces...this is the way that I do it: I always start with the bottom pieces and build the layers up as I go...the focal piece is usually last. I use a 1 inch brush (an old worn watercolor brush for this purpose. You could use a foam brush.) I apply the Matte Medium evenly to the substrate in an area large enough to cover the area of the piece that I am collaging. I position the collage piece where I want it and then brush over the piece to smooth out any air bubbles. In essence, you are now applying the Matte Medium that is left on the brush on top of the college piece.
The Matt Medium dries clear so don't worry about getting it outside of the working area. Just make sure to smooth it out so it doesn't leave ridges when dry. The trick is to use enough Matte Medium to adhere the piece but not to soak it. The wetter the piece (especially magazine clippings) the more wrinkles you will have but don't worry about them either...as the paper dries, a lot of the wrinkles will disappear.
When gluing with Mod Podge or Matte Medium...once you stick it down...there is no getting it repositioned without making a mess and ruining the paper clipping. Having said that...for pieces where the position is critical and for larger pieces, I leave the collage piece on the substrate and lift one side of it...apply glue under it and paint out the bubbles...then I lift the other side and do the same thing. Be sure that you get the glue under the middle area where the lifted sides meet!
Tip: When I use a glue stick, I always apply glue to the back side of the collage piece and then apply it to the substrate. Always apply the glue by starting in the middle and moving the glue stick out toward the sides and off the paper. This eliminates the problem of the glue globing under the collage piece. Use an old telephone book or magazine as a gluing surface to catch the excess glue. When the page gets covered in wet glue and there is no dry spot left just rip off the page to expose a nice dry page underneath.
DOODLING AND MARK MAKING:
Okay...Now is the time to grab all your paint pens and gels pens and start embellishing what you just glued down. But first...make sure that you have given your work enough time to dry. Using your pens over a surface that is not dry is a sure way to ruin your pens. I cannot stress this enough!!!!
I start my mark making by outlining pieces that need be lifted from the background or the piece below it. Next, I like to use a white pen and make dots or circles followed by using colored pens. I don't over think this process and find that if I doodle and then doodle some more...I usually like the end result. I keep going until every collaged piece has been marked in some way.
Now...I know what you are thinking! You may not be a doodler and don't know where to begin with making patterns. Well...there are lots of Zentangle books and books about doodling or you can even make your own. That's what I did because I am not a doodler either. I find patterns that appeal to me and draw them in a reference journal that I made for that purpose. I did the same thing with different lettering styles. Now when I get stumped for a pattern...I turn to my journal. This is a great way to prevent a creative block! Too much thinking can sometimes stifle your creative process!!!
LETTERING:
I have adopted Teesha's style of lettering (for now) because it is easy for me to do and I think that it looks great! It was amazing to watch Teesha letter because she does not lay it out in pencil first!!! She has been doing it for sooooo long that she instinctively knows how to space the letters and words. The other thing that Teesha does is to mix upper and lower case, the size of the letters and the angle of the words. Oh...I almost forgot...she fattens the letters and adds the serif as she writes them. In other words...she does not do all the lettering first and then go back to fatten them and add the tails.
You may have your own style of lettering or prefer something different from what I have used. There certainly are plenty of examples on the internet in which to choose from. Place as much importance in drawing your letters as you have in the art work. The lettering IS part of the art!!!!
Tip: Use a white Charcoal pencil to rough out the lettering first and once the ink is dry, erase any remaining charcoal by using a kneaded eraser.
SHADING AND FINAL TOUCHES:
I always like to have the light source coming from the upper right corner of the page. Another personal preference. However, you may feel more comfortable with just the opposite. When I shade the letters or objects in the picture, I shade the left side and bottom a darker color and if needed, highlight the opposite (light source side) side with a lighter color. Don't get too concerned about making this happen though...some of the pieces from the magazine already have their light source established and it may not agree with your overall scheme. Notice how the girl's head is darker on the right and lighter on the left? Just the opposite of how I shaded the rest of the collage. Oh well...It is what it is!!!! Hopefully not too many people notice! lol!
To add depth to the background and some of the key elements like the flower in her hair and the ribbon, I shaded with Prismacolor Primer Pencils. I love these waxy pencils because it is possible to go from very light, by using a very light touch and pressure, to a very dark color by applying a much heavier pressure.
I did not pay attention to the light source when shading the background and shaded all sides as well as all sides of the girl. I wanted to give the effect of the girl and boarder floating above the background.
HOW TO MAKE THE STRIP FOR THE EYES.
Because the raincoat is transparent, I wanted to give the illusion of something transparent over her eyes. I did this by placing deli paper over her eyes and drawing the eye area with a lead pencil. I used a white acrylic paint pen (you could use white acrylic paint) to paint the back of the deli paper. Once dry, I glued it to the face and outlined it with a black pen.
SOME OF TEESHA'S RULES:
1. She never tears anything and slaps is down. "Everything has a clean edge."
2. She never puts a square or rectangular shape piece of collage at a angle.
3. She never leaves "gaps between pieces" used in a border..".they need to be connected."
One final word...My collage work does not look anything like Teesha's latest work. I would love to be able to do what she does but there is only one Teesha and I think that it is important to keep your identity in your art and not try to be someone else. We are all unique! So...kick back, put on some music, enjoy the process and be YOU! Most of all...Have FUN!
There you have it!!! The process for making a Teesha Moore style collage.
I hope that you enjoyed this tutorial and decide to give collage a try. I also hope that you will someday have the opportunity to take a class from Teesha...that is, if you haven't already. She is an amazing artist and teacher!!!
Please let me know if you have any questions. I love to share my art experiences and would love to hear about your's also!!!
Hugs,
Ginny


