Saturday, December 13, 2014

MORE YUPO AND ALCOHOL INKS


I tried to work on my Christmas card but I am soooo uninspired.  Not because I don't have the Christmas spirit…I do, I do!!!!  But because I made the painting for the card 8 1/2 " X 11" thinking that I would scan it and then shrink it to card size. Well…..when I shrunk the card down, it lost a lot of detail and color intensity.   I guess that it is back to the drawing board on that one!!!

In the mean time….an artist friend of mine made the most beautiful cards using yupo paper and alcohol inks.  I thought that I would give it a try!  She used the originals to make her cards where I decided to use prints from my new laser printer (more about that in a future post) and use those instead.   After all, I may find another use for the originals later.

Some of you may not think that these cards are too Christmasy but I'll make it work.  Also, I plan to give these as gifts.


This is how I made them:

1.  Cut the yupo paper to 5 1/2" x 4"

2.  Lightly mist the yupo paper with 91% Isopropyl Alcohol.  You can find this at any Drug Store.

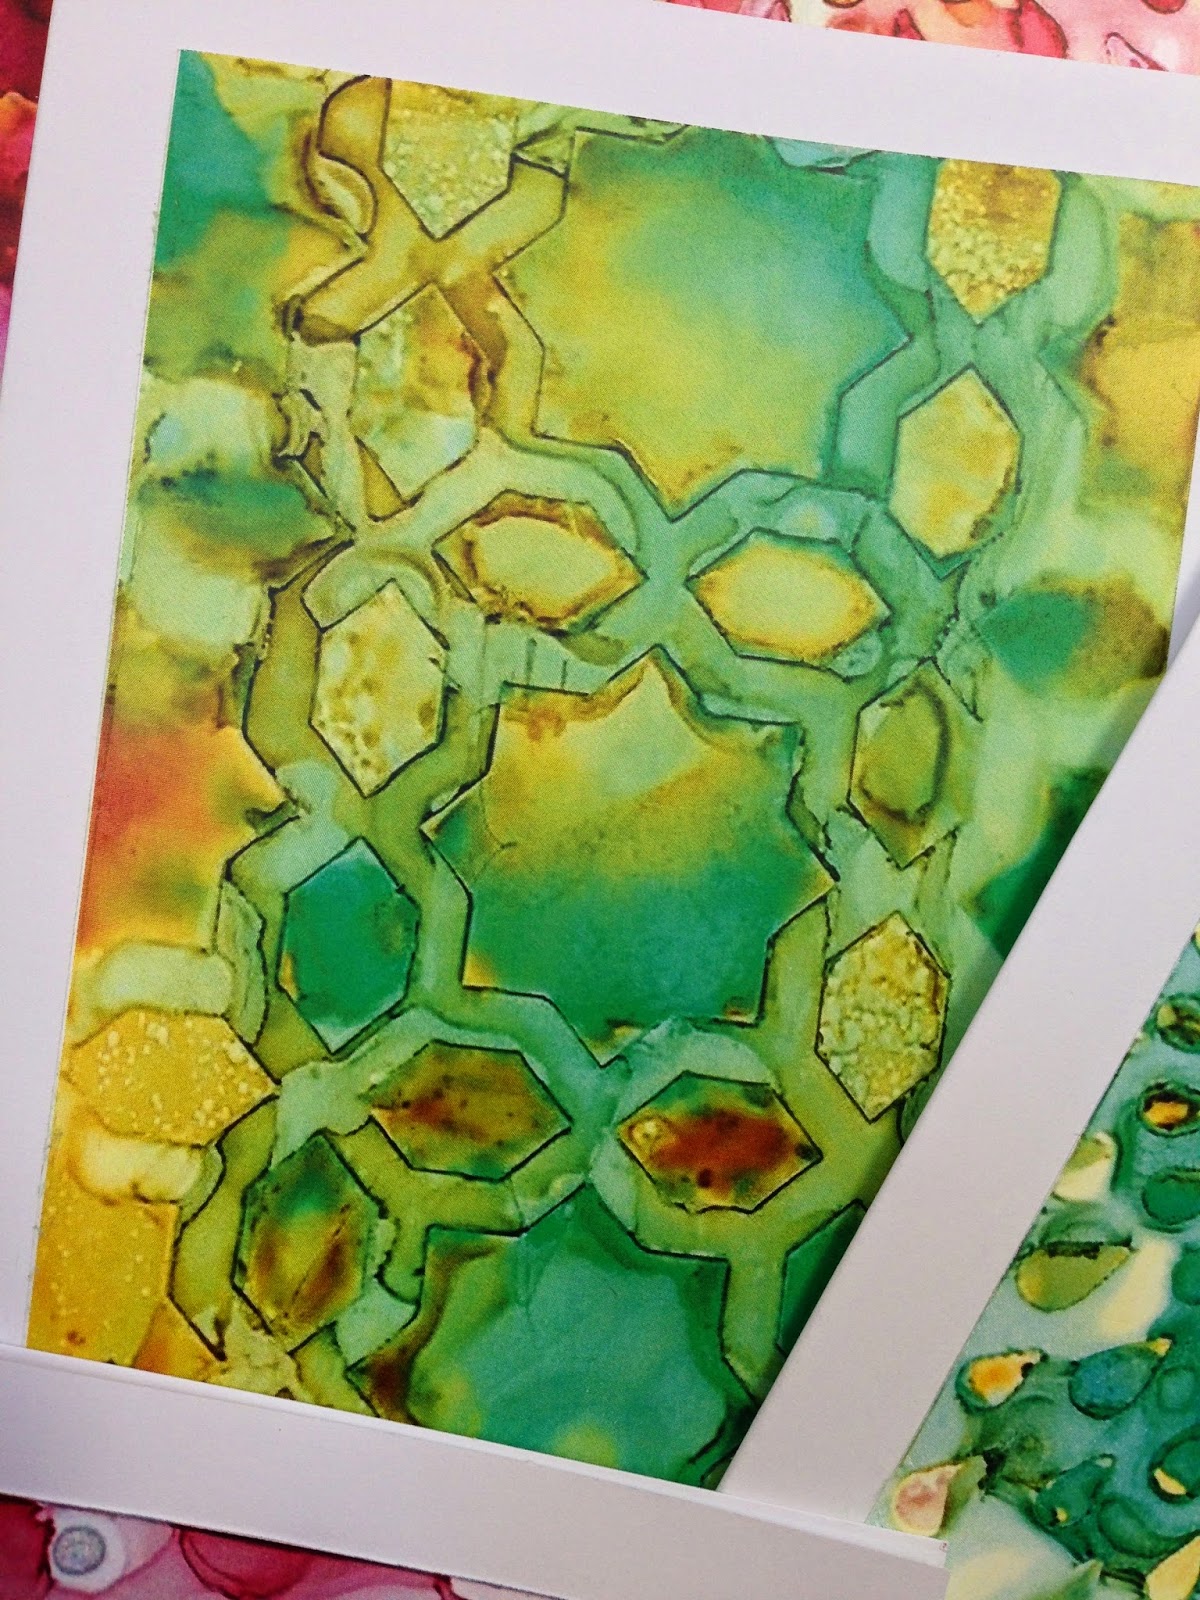
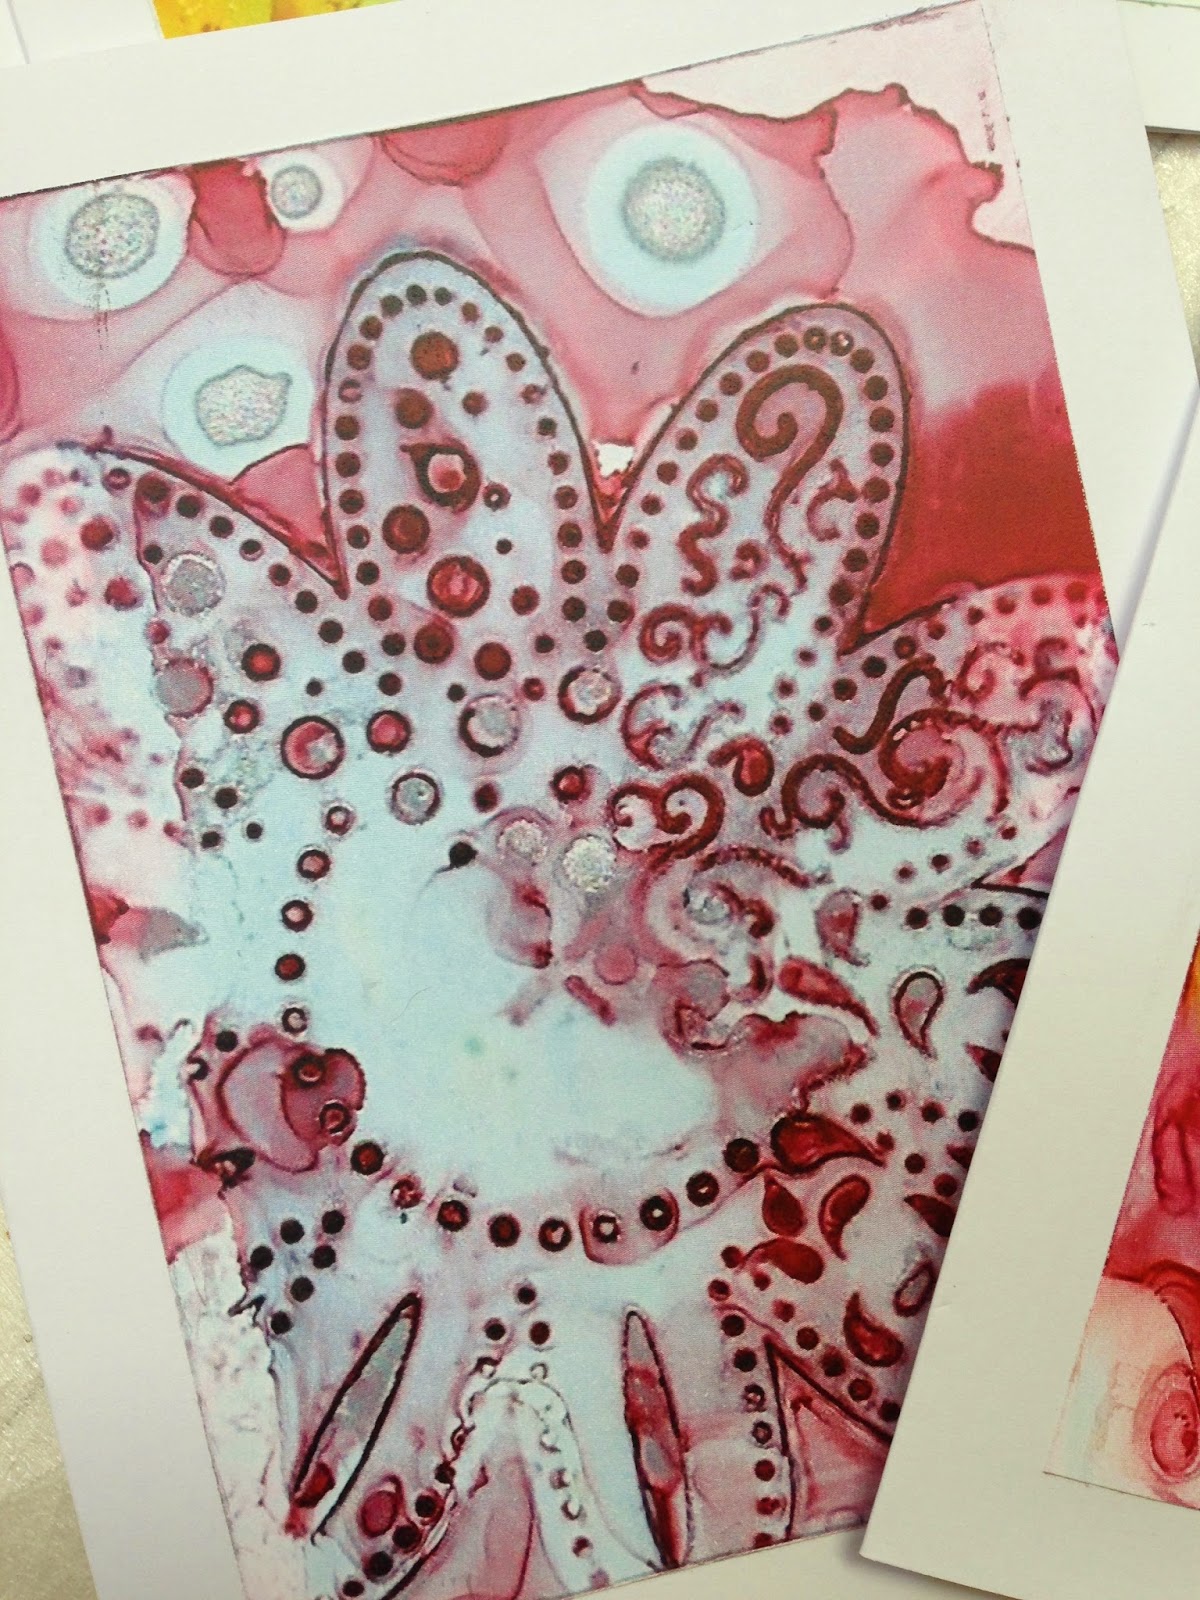
3.  Drop the lightest background color onto the misted yupo and brush evenly using a paint brush.  I covered the entire sheet but if you wish to have some white show…just slap it on!!!  Also, don't worry about streaks…they will even out on their own as the alcohol flows.

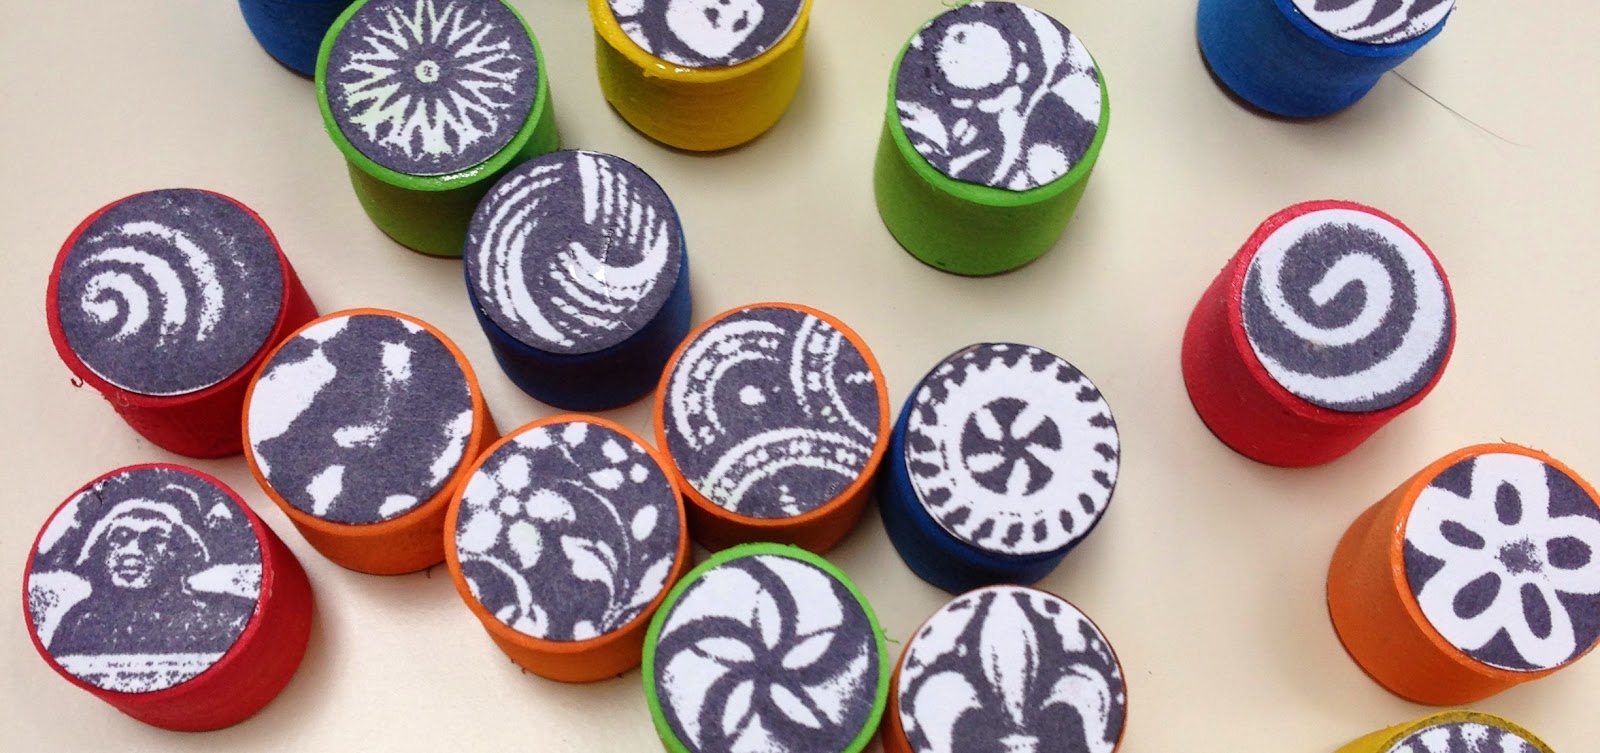
4.  While the background is still wet, place the stencil over it.  It is best to use the very thin plastic stencils as you want them to grab or stick to the background.  If the background dries before positioning the stencil, mist either the back of the stencil or very lightly mist the background with the 91% alcohol.

5.  Drop two to three different colors onto the page….making sure to drop through the openings in the stencil.  I sometimes coaxed the ink with a brush.  Do not use complimentary colors or they will turn to mud.  Try colors in the same family.  Pinks, reds. purples and yellows or Blues, greens and yellow.

6. Set aside to dry.  Tip:  if you push on the stencil and you see ink move…it is not dry.  I left mine to dry overnight just to be sure.  I am very impatient and often tempted to pull the stencil back to look under it but be warned….this will cause the inks to flow into each other and loose detail.

7.  Once dry, pull the stencil off and admire your work!!!

Now, most importantly…CLEAN YOUR STENCILS!  You can clean them by misting them with alcohol and gently wiping with a paper towel.  Also, if you are making several of these and switch colors...clean your stencil and brush between use or the colors may turn to mud when the alcohol on the stencil or brush is reactivated.

There you have it!!!  Alcohol ink and Yupo 101!

Until next time,

Hugs,
Ginny


Friday, November 7, 2014

PLAYING WITH YUPO


There is something magical about a group of very artistic ladies trying out a new product for the first time.  The triumphs, the failures and encouragement from each other pours electricity into the air.  It's like the combined excitement explodes!!!!

Today at Thrusday Art Group, we were introduced to Yupo and alcohol inks by one of our members who so generously provided the materials for our play.  If you are not familiar with Yupo, the best way that I can describe it...it is a plastic like paper.  It can be used with watercolor, acrylic paints and inks and because it is plastic like….the paints just sit on the surface, move and flow into one another and provides beautiful saturated color and marbling.

For our play, we used Tim Holtz alcohol inks.  They are quick drying and come in gorgeous vibrant colors.  We dropped ink directly from the bottle, blew it with a straw, textured with Saran Wrap and stencils and dropped 91% alcohol onto the ink to create further movement, ….you name it…we tried it.  A fun day was had by all!!!!

Here are a few of that I made:

A little doodling was added with a white and black pen.

Drops added... one on top of the other.

We blew ink with a straw

This will probably become an underwater scene.


I am not sure what I will do with these or if I will ever try Yupo again.  It was fun to play with but until I added the doodling, I really didn't see how this would fit into my art.  Anyway…….

Until next time….

Hugs,
Ginny


Monday, October 27, 2014

PAINT A SUGAR SKULL!

With Halloween just around the corner, I couldn't resist painting a sugar skull to hang on the wall of my studio.  Especially when I found these slightly smaller than life size papier-mache masks on sale at Michael's for only $1.00.

I decorated the mask with paper dinner napkins (flowers) and then used acrylic paint pens for the pen work.  Easy peasy!!!!


FYI:  I used Acrylic gel medium to glue the napkins and separated the ply before gluing.  Napkins have two or three plys and must be separated in order to adhere properly.

Have a safe and Happy Halloween everyone!!!

Hugs!
Ginny

Monday, October 13, 2014

WHAT HAVE I BEEN UP TO????

Two weeks ago I decided that I need to make a pull over T-shirt dress…something that I can throw on quickly, grab my purse and fly out the door.  I didn't get too far when my sewing machine of thirty years smoked!  Eeeek!  I quickly turned it off…grabbed the fire extinguisher (didn't have to use it) and waited for the smoke to dissipate.  This was my all time favorite sewing machine…a Bernina Record 930.  The last electronic machine that Bernina made before coming out with computerized machines.  Anyway, to make a long story short, I took it to the shop for repair and was told that Bernina no longer has the needed parts and that it probably could not be repaired.  Well….what is a gal to do?  Buy a NEW machine of course!!!!

I bought a Bernina 560 and it is AWESOME!!!!  It is a machine that has over 100 (9 ml wide) decorative stitches, a touch screen and a needle threader just to name a few of the unbelievable features of this machine.  The average machine has 5.5 ml wide stitches so you can imagine my excitement!  Plus, the fact that all stitches can be adjusted in width and length and can even be welded together via a memory mode.  My mind is just spinning with ideas!!!!

These are two of the things that I made in class to learn how to operate all of its features:

A COVER FOR A 6" X 9" STRATHMORE WATERCOLOR PAD


INSIDE VIEW

ZIPPERED BAG

VIEW OF INSIDE LINING

Projects courtesy of the Bernina Sewing Center, Lake Mary, Florida.  If you are ever in the area, stop by and check it out…you won't be disappointed!!!  They have lots and lots of beautiful finished projects such as quilts, home decor, purses, clothing and all the materials needed to make them.

If anyone is interested in learning how to make the zippered bag, I would be glad to make a tutorial.  It is not complicated nor is it necessary to have a machine that makes decorative stitches.  It could be made using a printed fabric, using ribbon or lace instead of the decorative stitches or even painting the fabric with your own design.

Until next time,

Hugs!
Ginny

TRYING OUT A MOLESKINE


Where do I begin?  I am trying out a Moleskine journal for the first time.  I am a Moleskine virgin!  As  with using any art medium for the first time...there are always challenges.  In this case…it is the thinness of the paper.

I already know that the paper in the Moleskine journal will probably support only graphite and colored pencil so I plan to use it just for pencil sketches.  No ink! That was the plan but once I completed my pencil sketch, I felt that something was lacking and outlined it in ink.  Well...guess what?  It bled through to the other side!  Anyway, I did what I usually do...I decided to go with the flow and let happen what may and deal with the issue later.

In the art world there is always a solution to a problem…right?  Maybe a little gesso or gluing something over it?  Or….maybe even gluing two pages together.  What would you do?  I would love to hear from you and learn how you deal with this issue.

Until next time!

Hugs,
Ginny


Thursday, August 28, 2014

GETTING BACK TO BASICS


There are times when I feel the need to get back to basics and for me that means pencil drawing.  Start at the beginning...grab paper and pencils and draw from real life or photographs.  Make it as realistic as possible…not abstract but an honest to goodness likeness of what I see or how I interpret what I see.  For me, this is the platform or jumping off point of where all my art comes from.  Getting back to basics teaches me to be observant of the details and these details can then be interpreted in various ways to draw or paint the abstract, whimsey, fantasy, etc. 

My inspiration photo was found on Pinterest.  It is a picture of a little girl with blonde hair cut in a "Buster Brown" cut.  I was attracted to this picture because it reminded me of ME at that age.  I always had a "Buster Brown" haircut thanks to my mother's haircutting skills.  Do you see the resemblance?  


I made the sketch into cards by scanning, printing, embossing, coloring with neon markers and adding the faux rhinestone.  There you have it…..instant "Thank You" notecards!  PS…I tell everyone it is a drawing of ME!!!  lol

Until next time!

Hugs,
Ginny

Sunday, August 24, 2014

ANOTHER "BABY GOT BACK TO BACK" JOURNAL


I have made several of these journals…four to be exact and gave them all away as gifts.  I love the fact that they have a handle for carrying or hanging on a door knob when not in use and the fact that they can have a duel use depending on the type of paper used for the signatures…and the fact that the tools: pens, brushes, pencils, erasers, etc. are on board.  Great for those who like to journal in Coffee Shops or the like!

I learned how to make this journal in Roben-Marie Smith's 21 Secrets, on-line class.  In case you didn't see my previous post on the first journal that I made, this is a double-sided journal made from a gift bag that has a raffia handle.  It got it's name "Baby Got Back To Back" because the journal actually has pages on one side and then flips open to the other side where there is a second journal.  I love the versatility of these journals and I keep saying that the next one is MINE!  lol…we know how that goes!

For this journal, I used some stamps that I made with craft foam and carpet tape.  


The cover art was made by using stencils and spray inks, adding a few doodles, stamping with the craft foam stamps, and then adding collage elements from Teesha Moore collage sheets.


I used the top half of a Container Store bag for the front cover, bordered it with B&W scrapbook paper, glued it to corrugated cardboard...then stitched the edge with my sewing machine.  This adds strength as well as visual interest.


Before sewing the corrugated cardboard to the bag, I dressed it up by adding more printed paper and tearing off areas of the cardboard. Next, I stitched elastic to hold the tools and made a lace pocket on the back cover to hold more tools.


The signatures for the front part of the book were made with watercolor paper and the signatures for the back part of the book were a combination of Bristol paper and a really cool bag from Trader Joe's that has Steampunk style graphics. When I first saw this bag….I knew that it would somehow find its way into my journals!  lol


Lastly, I glued it all together using "Yes Glue", sewed in the signatures and added a ribbon tie closure.


Whooohooo….DONE!…and, mail to the Birthday gal before I thought to take a picture of the completed journal!  Aaarrrgh!  Anyway, it looks very similar to the one pictured.


Until next time!

Hugs,
Ginny

Wednesday, July 23, 2014

COLLABORATIVE WORK WITH JOANNA GRANT


A while back, Joanna Grant of Joanna Banana Design Originals, got the wonderful idea to do something with those half-finished pieces of art hanging around her studio  The idea was to mail her half-finished pieces to her artsy friends (first obtaining their permission) and invite them to finish the pieces and then mail them back to her.  In exchange, she also invited them to mail a half-finished piece of their art for her to finish and mail back.

Doesn't this sound interesting?  Are you excited yet?  I bet that you have some half-finished pieces of art that you wished someone would finish for you too. Think of the surprise and excitement when you open that package and find your original art work completed in a way that you never would have imagined.  This was great fun and I would do it again in a heartbeat and encourage you to contact some of your artsy friends and start swapping art work.

First up:  The beautiful half-finished art work that Joanna sent to me.  


Joanna relayed that she started with a substrate of salvaged matte board and then covered it in recycled wallpaper for the background.  In case you are not familiar with Joanna's work, I would call her the "recycle queen" because she uses a lot of recycled materials and at times she even recycles her own art work.  Next, she added a laser print copy of the vintage girl, added several layers of paint and swirly die cut pieces made from her Silhouette machine….added a few pieces of book text and the leaf.  That's as far as she got before she mailed it to me to finish.

Next up, the finished piece:


I have to admit that putting that first pen stroke to someone else's art work was at first a little intimidating but once I "got on a roll" it quickly went away.

To finish the piece I basically used acrylic paint pens to add dots and circles to lighten or deepen colors.  I eliminated the "Princess Leia" buns with paint and the addition of a flower and butterfly.  Lastly, I added the "dream" sign.  A little color added here and there and drum roll, please….finished!

The half-finished piece that I sent to Joanna.


This is my half-finished piece that I sent to Joanna.  It consists of a gelli print background glued to a matte board substrate.  Various pieces of gelli prints and hand painted papers were added along with the two faces and hand cut from magazines.  Pretty simple, huh?

Now, get ready…this is what she sent back:  


PRETTY AMAZING!  RIGHT?  I am blown away by this piece and keep looking at it, studying to learn how she made it.  I know that Joanna makes a lot of painted embellishments herself and stockpiles them for future projects.  Embellishments like the painted circles and flowers.  (This is something that I think I will implement into my art process.)  You can't see from the picture but she added glittery tape, rhinestones, foil and 3-D flowers.  She even finished the back of the piece which looks like a collage of colored tissue paper and paints?  Joanna's work is always superbly done and finished to perfection so I guess that the finished back shouldn't surprise me.  lol!  UPDATE:  Joanna now has a description of her process on her blog.  Hop on over and take a look!!

Thanks, Joanna for a fun project.  I loooove it!!!!

Interested in seeing more of Joanna's lovely work?
Visit her blog: http://joannabananadesignoriginals.blogspot.com

Until next time!

Hugs,
Ginny

ONE THING LED TO ANOTHER….


Anyone else have problems with the unmounted cling stamps 
falling off the acrylic holder?  Well…I DO!  
Sooooo...I decided to mount them permanently to wood blocks.  
I couldn't find wooden blocks but instead I found "foam counting blocks" in 
the children's section of the Michael's store.  
These were just the right size and worked perfectly.


After mounting alphabet stamps to the square foam blocks I was left with many cylinder shape counting blocks that were also included.  Not wanting to waste anything I decided that I would use them to make stamps.  I have done this before by carving or impressing a design in the foam using different tools but I think the foam was more like styrofoam.  This foam resembles the foam that you heat and press objects into….so I thought that I would give it a try and see what happens. With my heat gun in hand and a few fancy buttons and brass stampings, I went to work.

First, let me tell you...these little buggers went flying when I applied the heat gun to them.  Whoof!  Off my desk they flew!  They are so light weigh.  The solution? Wedge them into the inside corner of a jewelry size box with the heat gun aimed toward the corner.

OK, now that we have that over with...here is what you do.  Heat the top side of the foam until it gets shiny and then quickly mash your button or object into the foam and hold for about 30 seconds.  Then stamp your image on a white piece of paper and if you are happy with it...cut or punch it out and glue it to the opposite side of the foam.  Be sure to line up the image with the stamp.  In other words…don't glue the image upside down.  This will be your guide for stamping.

If you are not happy with you image, wash the ink off, let it dry and start over by reheating and making another impression.


I have no idea how I am going to use these little gems but I am sure that I will think of something.  Maybe some patterns?  I see possibilities for the zebra looking pattern.


Until next time….

Hugs,
Ginny

Tuesday, July 22, 2014

USING A CUTTLEBUG MACHINE TO EMBOSS METAL


OK everyone…I need a change and it's time to put my journals down and start making jewelry.  Not that I need more jewelry…I have tons of it that I either made or bought but I looooove making jewelry…in particular the metal forging part.  So here we go!!!!

My inspiration came while at our local Michael's store.  I noticed that Cuttlebug (the paper embossing machine by Provo-craft) now has metal blanks that can be used with the plastic embossing folders.  Sorry...but I wasn't able to determine the type of metal nor the gauge metal.  Anyway, a light bulb went off in my head and I thought that I would give this a try with the metal that I have on hand... plus, I know that I can anneal the metal to make it softer if needed.  Well….I have to tell you…It worked great!  That little Cuttlebug machine is like a mini rolling machine!!!

First, I need to caution you that because the Cuttlebug machine and the embossing folders are not made for this purpose, you need to be careful so as not to exert any more pressure than you would when embossing paper.  In other words...don't force it!

The first metal that I tested was scrap jewelry that already had coloring and patina added.  It looks to be 26 gauge copper (not certain).  I re-cut some of the pieces, reshaped some by twisting and curling and left others as is.

scrap jewelry pieces

I tried the Vintaj metal embossing folders on some by using the "A" and two "B" cutting plates for the first pass and then added a 3ml. piece of mylar for a second pass.  This gave me a pretty decent emboss.  Of course, a lot depends on the gauge metal and how soft it is...so go slowly and like I said…don't force it.

Embossed with a Vintaj metal embossing folder

I also tried a few with a plastic embossing folder.  This required one "A" and two "B" cutting plates for the first pass, adding a 3ml sheet of mylar for a second pass and adding a folded paper napkin for a third pass.

Embossed using an Anna Griffin paper embossing folder. 
Embossed with a Cuttlebug paper embossing folder.

My final experiment was with 26 gauge copper metal (not annealed) and a paper embossing folder. It went through with one"A" and two "B" cutting plates and in two passes.  The emboss is pretty darn good!  Please excuse the tarnish…these will receive a polish and patina later.

26 gauge copper un-annealed
I learned from this experiment that the cutting plates and added shims will vary depending on the gauge metal, type of metal and whether the metal is annealed or not.  Now that I have gotten used to the feel of how the metal rolls through the machine, I am confident that it can be done without damage to the machine.

MAKING DOT PATTERNS:

Another handy tool that I love to use is a spring punch.  It's great to use with a hard rubber pad to put those darling dimpled/dot designs in metal.  Just mark where you wish to place the dots with a sharpie marker, put the metal piece face down on the hard rubber pad, position the end of the punch on the dot and punch down to activate the spring.  Presto!  A beautiful dot pattern is made!

You can find the spring punch and rubber pads at most hardware stores for only a few dollars.

Well, that's all for now so until next time…..

Hugs,
Ginny