And....You have to love the unexpected surprises. It never turns out as planned and I have to say... even the worst prints can be cut up and used in other art pieces. So far, all of my prints have been used as journal pages. I just add a little doodling and lettering and called it a day!!!
This is how I made these prints:
I used two colors for this print. First I brayered yellow paint all over the plate, stamped with bubble wrap, used a texture comb and pulled a print. Next, I brayered blue paint all over the plate, stamped with a tile stamp, circle stencil and bubble wrap; placed three mermaid masks on the plate and pulled a print. I planned to add a third color but decided that I would lose some of the delicate pattern so I quit while I was ahead!!
These are the tools that I used to make the mermaid print. Notice that I don't wash my stencils or masks! (grin)
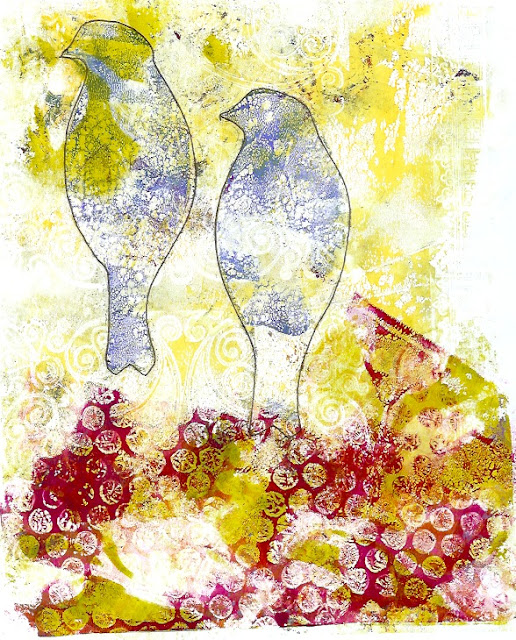
For this next print, I used three colors. The first color used was yellow and textured with a texture comb. Next, a magenta color was brayered only in select areas and textured by using a stencil and bubble wrap. For the last layer, I brayered blue paint all over the plate, textured it with a texture comb and then positioned the bird masks prior to pulling a print.
I love the texture of the birds especially the one on the right and think that I might make prints of birds to cut up and use as tags or ornaments.
This print is a ghost print of the previous print. A print was taken after I removed the bird masks. (This picked up the blue paint left over from the previous print.) Then I brayered yellow paint all over the plate, textured it with a tile stamp and pulled a print. Next, I brayered green paint in select areas, used a leaf mask and pulled a print. Lastly, magenta paint was used in select areas, textured with bubble wrap and pulled a print. The nice surprise on this print is how the bubble wrap made little round star flowers. That's what I love about the Gelli Printing Plate...you never know what you are going to get!!!
I hope that you enjoyed seeing these prints made from the Gelli Printing Plate and I hope that you are inspired to try some of your own.
If you have a Gelli Printing Plate and would like to share your experiences or tips, I would love to hear from you!
Until next time,
Hugs,
Ginny


Ginny, these are exquisite! Thank you for posting your beautiful art and part of your process!
ReplyDeleteThank you Valerie, I go into more detail in an earlier blog. If you search for gelli prints, all the posts related to gelli should come up.
Deletethank you for sharing your process...I want those mermaids!
ReplyDeleteI just came across this post on Pinterest...where did you get the mermaid masks? I LOVE them!
ReplyDeleteHi! I came across your blog through Pinterest. I'm new to using the Gelli plate and I am seeing everyone talking about masks and stencils. Your prints are just awesome!
ReplyDeleteWhat kind of stencils or masks are you using? Are they mylar or paper? I appreciate any help you can give and thank you for your time!!
Hi Christina! Anything goes...I have used good ole store bought stencils made of mylar and have also cut my own from mylar…like the mermaid and bird masks. The only paper that I have used thus far is scrapbook paper that already came with cutouts but I have not cut my own paper stencils or masks simply because I had access to mylar. Scrapbook paper or card stock works great and will become more durable when coated with layers of paint. The only downside to using paper is that it cannot be washed and will eventually become too coated with paint to give a sharp image. The plus side of mylar is that it will last forever with care (I wash the paint off occasionally) and when making your own masks and stencils, it is transparent enough to allow for tracing a pattern. I hope this helps…and have fun with it!
Deletevery nice prints! i'm wondering where you got the tile stamp. is that a craft store or home depot find?
ReplyDeleteThank you Lil! The tile stamp was part of an 8 piece set that I bought at JoAnn's. It came with a border, two corners, four small square designs and the large 6 in. square tile. It is by Inkadinka Clings.
DeleteGorgeous prints! Thanks for the tute!
ReplyDeleteThank you Denise! I haven't played with my gelli plate in quite a while. I do need to get back to it.
DeleteThank YOU!
ReplyDeleteI discovered the picture of your supplies on Pinterest, & I had a completely different idea about what the mermaids are (not masks.) I love how your gel prints came out and also love the bird on the right.
ReplyDeleteSo what did I think your mermaids were? Perhaps this will spark an idea for you to explore: I thought you had pulled a gel print on shrink film using alcohol ink, then cut mermaid silhouettes out of the film.
Now that I'm sharing this idea with you, I think I'm going to have to try it myself! Maybe stamp one side of the film, pull a gel print on the other, then shrink. ...ahh so many ideas