Showing posts with label painting faces. Show all posts

Wednesday, October 18, 2017

WORKING IN MY JOURNAL OF "FACES"


"EVERY ARTIST DIPS HIS BRUSH IN HIS OWN SOUL, 
AND PAINTS HIS OWN NATURE INTO HIS PICTURES."
Henry Ward Beecher

I had a very interesting conversation with a 94 year old friend of mine who has some very old fashioned ideas about a myriad of topics, in particular "ART."  We happened to be talking about how we define "art."  This all came about when I started to tell her about my journal of "faces."  She quickly interrupted me when I got to the part about finding my inspiration from photos of faces that I find on the internet.  She said "that's not art."  According to my friend, art is drawing or painting from real life figures or landscapes and not from, in her words, "copying a photo."

I think that we can all agree that my friend's definition of "art" is a very narrow and shortsighted view which would leave out many of the masterpieces hanging in art galleries today but yet she is not wrong.  Art is personal...It is whatever appeals to the viewer and what the viewer or artist considers to be art.  If you look on the internet you will find many definitions and no two are alike. There is no right or wrong.  So my question is...why did I feel that I had to defend my position as an artist?


INSPIRATION PHOTO:


For this painting I used Derwent Intense pencils, chalk paint for the highlights on the skin, Molotow yellow paint pen for eyeliner and hair and pan pastels for the blue background.  I love the way the Intense pencils worked on the hot press watercolor paper.  Nice and juicy!

Thanks for stopping by and until next time...

Hugs,
Ginny

Saturday, September 2, 2017

TURTLE BOY


Who could resist drawing this cute little boy with a fish in his mouth and a turtle hat?  Not me!  I took some creative license and changed it up a bit, giving him more hair, a full view of the turtle on top of his head and changed his garment to a T-shirt.  This fit the page better as my page is square where the subject picture is elongated.

Originally I was going to do a sepia toned ink drawing but that fish called out to me for some color...especially a metallic aqua color.  After that, the color started to flow...coloring his T-shirt, the turtle and tinting his face to make it less red.

I started with a Walnut-Ink background over the entire page.  Once dried, I drew in the shape with a pencil and then inked it with a waterproof Uni-ball Vision pen (available at your office supply store).  The fish was painted with Silk acrylic paint and the face, T-shirt and turtle were tinted using Derwent Graphitint water-soluble pencils.  The white on his face was painted using Liquitex Modeling Paste mixed with white acrylic paint and then applied using a scruffy old brush.

I like the way that everything pulled together and might do a whole series of paintings using this same technique.  What do you think?


INSPIRATION PHOTO


There you have it...how I approached painting "Turtle Boy."

Until next time...

Hugs,
Ginny

Tuesday, August 29, 2017

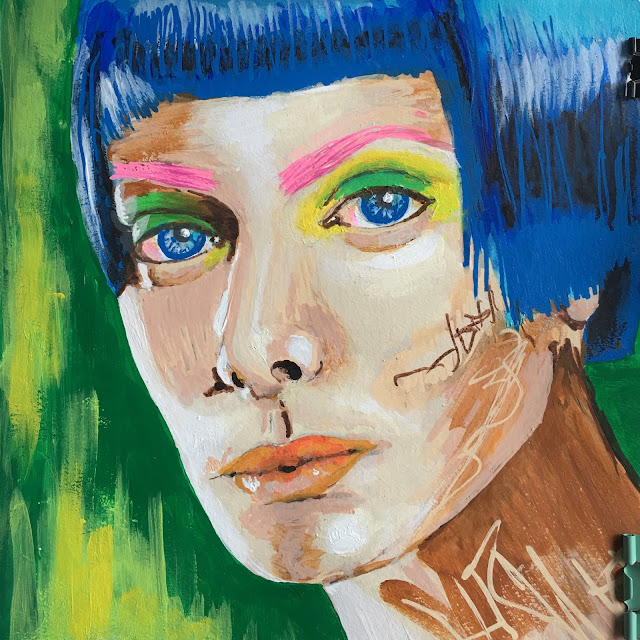
BLUE HAIR GIRL


"Blue hair girl" was painted with acrylic paint pens (Molotow and Montana) and soft body acrylic paints.  I tried several techniques for applying the paints and really wasn't pleased with any of them so I kept layering and layering until I finally said...good enough!  Move on!  I may come back to this later.

The skin tone was the hardest to paint.  I tried to block the colors from dark to light, creating the medium tones by overlapping and it seemed to work until I lost the shape of the nose and had to start over.  What a learning experience!  With all other mediums I can see the pencil outline beneath the paints but with acrylic paint it is a different story;  I lost the shape of the nose, the right eye was too high and I had to paint it over....ugggh! There are many layers of paint on this beauty!


INSPIRATION PHOTO:


Painting faces with acrylic paints proved to be a real challenge and is something that I definitely need more practice in order to become comfortable.  Maybe it would be easier with soft body acrylic paints and a paint brush as opposed to the paint markers.

Until next time....

Hugs,
Ginny

Sunday, August 20, 2017

EXPLORING FACES...A NEW JOURNAL


"The face is a picture of the mind with the eyes as its interpreter."
Marcus Tilius Cicero


I have always loved drawing faces.  When I look at my portfolio from high school, (yes, I saved them.  They must be true antiques by now...lol.) it is filled with faces drawn in pencil, ink, charcoal, pastel or watercolor.  I tried all the different mediums, except for oil.  I never could wrap my head around painting with oils or the yucky smell of turpentine...so no oils will find their way into this journal except for the occasional oil stick which is mostly wax.

With this journal, I hope to explore new techniques and perhaps find my identity. Will I prefer watercolor as opposed to acrylic?  Will I prefer drawing whimsical faces as opposed to realism?  Will I find my unique style or will I continue to follow the path of diversity?  Wherever this journey takes me, I will go with eyes wide open...accepting my successes as well as failures and learning not to be too hard on myself when things don't go according to my liking.


BOHEMIAN GIRL

When I painted this girl in watercolor, I realized that I forgot how to paint skin tones.  I am sure that there is something on the internet that explains this but a friend of mine just happened to be at my house with her inexpensive set of watercolors which had a tube of paint named, of all things, "Flesh." 
Wooo hoo!  You can't find this color in artist grade watercolor so I am very grateful that she offered to share.  


 INSPIRATION PHOTO:

This is the inspiration photo that I used for my painting.  I plan to tape them to the opposite page of my journal to remind me of my thought process and to see what I should have done differently or what I might try again.  


BONNET GIRL

This face started as a pencil drawing, then I added s little collage to the bonnet, stenciled a few flowers and texture using gesso and lastly, it was tinted using Ranger Distress Inks.


INSPIRATION PHOTO:


GOAT BOY

"Goat Boy" was done using a technique that I learned in Kate Thompson's "Children Of The Wild" class.  It was drawn in pencil, painted and stenciled with gesso on a copy of antique ledger paper and then highlighted using a R&F oil stick.

If you are interested in learning this technique from Kate, her on-line class is still available on jeanneoliver.com.  I have taken classes from Danielle Donaldson, Wendy Brightbill, Kate Thompson, Jeanne Oliver and many other fine artists.  Also, this site has many free videos so you may want to sign up to receive their notices even if you are not ready to join a class. 


THE THINKER

This guy started out as a pencil drawing then I shaded areas with a light wash using a Stabilo Aquarellable pencil.  I used a black Faber Castell Pitt big brush pen for the background.  These are two of my favorite tools for shading.  The Stabilo pencil is nice and juicy allowing for a very light wash to a solid black line and the big brush pen is perfect for solid black areas as it does not bleed through the watercolor paper.  It is filled with India ink unlike alcohol ink pens.


INSPIRATION PHOTO:


Well, I hope that you are enjoying the start of my new journal, "Faces." I am really inspired by all the photos that I have collected and can't wait to see how they reveal themselves on the page.

Until next time.....

Hugs,
Ginny

Sunday, January 18, 2015

COFFEE CUP JOURNAL

I know that you have probably seen the journals made from a paper coffee cup….like the kind that you get from Starbucks.  Well….I was at Einstein Bagels and they had the cutest coffee cups that said "celebrate close knit friends" with a little cartoon dog pulling the end of the yarn.  Perfect for cutting up and making a small journal.  The coffee cup cosy had a huge black mustache on it so I used that as well.

Here is the finished result:


And…this is what I am drawing inside.  Whimsical faces (close knit friends) using collage news print and Inktense pencils.


That's all for now….Until next time,

Hugs,
Ginny

Friday, January 2, 2015

HAPPY NEW YEAR!!!

Wow!  This year traveled at lightening speed!  
WHERE DID IT GO?  
So many projects started and sadly...not completed. 
Yet...so many completed and hanging on the walls of my studio or hopefully, 
on the walls of friends and family that I gifted my art. 

With the start of 2015 it is time for me to make promises 
of what I hope to accomplish in the New Year. 

MY NEW YEAR'S RESOLUTIONS:
1. Complete unfinished projects or swap with a friend to complete. 
2. Continue to learn new techniques and share with my blog followers. 
3. Blog more often and maybe even venture into posting video's of my art journals.
 4. Commit to placing all my energy into one art form with the hope
of finding my own style. 

This past year, I had done a lot of experimenting with
many different art forms which, I feel, resulted in my becoming a 
"Jill of all trades and a master of none!" 
In the New Year, I hope to focus on one art form…be it mixed media collage, 
drawing faces and the human figure, 
fantasy art/drawing from the imagination or 
maybe combining all three onto my journal pages.
A combination of collage incorporating drawing and painting of faces and people 
(animals too) all derived from the imagination. 

Sooooo….I guess that I better get started!!!!

Here are a few faces that will eventually find their way into my art  journals.


In closing, I would like to borrow a quote I saw on FB by Neil Gaiman and it is my wish for you:

" May your coming year be filled with magic
 and dreams and good madness,
I hope you read some fine books and kiss someone 
who thinks you're wonderful,
and don't forget to make some art…write or draw 
or build or sing or live as only you can.
And I hope, somewhere in the next year you surprise yourself."
                                                            Neil Gaiman

Let's make art as only you can and may you be surprised by its greatness!!!!

Hugs,
Ginny

Wednesday, June 26, 2013

PAINTED ARTIST TRADING CARDS

I have never made an ATC!!!  No never!!!!  I really don't know why...maybe because I see the small size as limiting or the thought of trading art work with other artists never occurred to me...or whatever was stopping me before...it is not stopping me now.

If you have been following my blog for very long you probably know that I have taken every single one of Joanne Sharpe's on-line classes.  Yes, all of them and I am not alone...so have many others.  And...after a while, you become pretty good friends with the other artists and become inspired and even influenced by them. That's how I became involved in ATC's.  One of the artists in Joanne's class started a closed FaceBook group to trade ATC's.  So....I thought that I would give it a try! "Nothing ventured, nothing gained."

To get started I cut up scraps of watercolor paper to size, grabbed my Tombow markers and various other pens and pencils and got to work making ATC's. Whenever I get stumped for ideas of what to draw, I always turn to faces.  Faces are the most comforting to me, especially when you are not trying to draw anyone in particular.  And...because of the small size of the ATC's, I thought that I would draw just part of the face and feature the hair by painting it bright colors like blue, green or pink.  Here is the first of six that I made.


And this is how I made them.

I used:

Strathmore 300 Watercolor paper
Tombow watercolor markers
Prismacolor pencils
black Pitt pen, fine
Acrylic Paint marker, Painter's
Signo Uniball white pen
Koi waterbrush
White charcoal pencil


Lightly draw the girl in pencil.

Note:  Use a good quality watercolor paper because the Tombow markers will not blend on an inferior paper.

Using the Tombow markers, color areas of the paper.

Do not color the area solid as we are going to move the color around with water from a water brush or paintbrush. This will give it a nice watercolor look.

Be careful not to let the areas touch while wet unless you purposefully want the colors to blend.

I wanted the purple and turquoise to blend for the background but I did not want them to mix with the green hair. One way to avoid one color from bleeding into the adjacent color is  to let each section dry before you paint.

Blending the colors with a wet paintbrush or waterbrush.

Wet the areas of the Tombow paint until it starts to flow and then push it around to cover the desired area to be painted.  If you have to scrub with the paintbrush, you may not be using enough water. At the same time, be sure to get rid of the hard edges.

This may look a little watermarked or splotchy.  If you don't like the way it looks, re-wet the area and push the color some more.  This takes a little practice but also keep in mind that watercolor is supposed to be watermarked. Also, don't worry too much about a smooth background because it will be covered by the lettering.

See how the purple and turquoise is not completely mixed together?  I was striving to blend the hard lines but still allowing both the purple and turquiose to maintain their true color.  I was not trying to obtain a new color by mixing the two.

Leave some white paper showing in the area of her nose and chin...areas that you wish to come forward.  The areas to recede are darker in color.  This gives the face its rounded shape.


Now to add detail.

I used a medium purple Prismacolor pencil, Violet 1008, to start outlining the features of the face and to streak the hair.

I used a deeper green prismacolor pencil and a white Signo pen to add additional streaks to the hair.  I also added shading to areas of the hair that would appear under her face or scarf.

I added color to the eyes, lips and scarf with Tombow markers.  


In this step, I have deepened the shadows with prismacolor pencils and used a black Pitt pen for detail.

I used the Pitt pen to draw the stripes in the scarf,  accentuate the facial features and necklace, and draw a border around the edge of the card..

I added a dot of white highlight to the eyes and bottom lower lip and added more hair streaks with the Signo pen.

The red stripe on the scarf is Tombow marker.


The final step is to add the lettering.

I used a white charcoal pencil to draw the placement of the letters.  This later erases beautifully using a kneaded eraser.

Next, using a fine tip paint pen, draw the letters.

Once the paint is dry, outline the letters with a Signo pen.

Once all pen work is dry, erase any visible charcoal lines.


I hope that you enjoyed this tutorial and give it a try!!!  I welcome questions!


Hugs,
Ginny


Here are a few more ATC's using this technique.


Thursday, November 15, 2012

JODI OHL ON-LINE CLASS


I signed up for another on-line class, "Painterly In Pink" by the very talented artist, Jodi Ohl.  I really wasn't prepared to take another class since I haven't finished all of Joanne Sharpe's classes but this one offered $30 worth of Luminarte paints and I also needed the paints for Joanne's "Bling It On."  So....I couldn't pass up a bargain like that...now could I?  Plus, I have one year in which to complete the course.  This seemed doable!

"Painterly In Pink" is about drawing and painting faces using Luminarte Silk glazes.  Jodi taught us how to draw the faces first in pencil and then glaze them with color.  We could be as realistic as we wanted or make them whimsical.  This is a class for all artistic levels and is a great one if you wish to learn how to draw faces.  To see Jodi's beautiful art or to learn more about her classes, visit her blog, Sweet Repeats.

Anyway, I was off to a great start....I drew my girl in pencil, painted the background of my canvas, glued the pencil drawing to the canvas and then it happened....the painting looked finished without the face glazed.  To add color by glazing the face would only fade it into the background where it would be lost.  At first I thought that I would go ahead and add the glaze and see what happens and maybe make adjustments as I go along but the very first brush stoke of paint on her face told me that I was making a BIG MISTAKE!  What to do???  I posted my canvas on the class Facebook site to get feedback from my classmates where my suspicions were confirmed....DON'T PAINT THE FACE!  Jodi was very kind and said "that sometimes happens" and that I may have found my style.  I definitely will explore this further as I love to draw faces in pencil and I also love to do collage.  It just may become my style.


Made some of my own collage papers


Finished canvas


I guess that part of being an artist is knowing when to stop.  At least I feel pretty good about that but now I still need to paint a face with glazes.  Back to square one!!!

I'll keep you all posted on where this takes me!

Hugs!
Ginny